In early November of 1997, I got a big surprise when my mom came home from work with the mail and told me I had a videotape from Nintendo Power Magazine. I'd already gotten one the year before, to promote the upcoming Nintendo 64 that September (the first of four I would get during the time I had a subscription), but this second tape was on something that I, like a lot of people, had no idea was even coming until it was almost here. The cover art for the tape, as well as the idea itself, was very intriguing. Being a rabid devotee of the
Donkey Kong Country series, I knew who Diddy Kong was, obviously, but him being the star of his own racing game? Having already played
Mario Kart 64 to death, this was right up my alley, to say the least. However, I had no clue what I was getting into when I popped that tape into my VCR, as it would prove to be one of the wackiest promos you could ever imagine. The format was that of a silly news program called
Hot Topic (I know what we're all thinking but I have a feeling it was meant as a send-up of
Hard Copy), which had a scoop about Diddy's latest adventure. The host, Trent Tillman, who goes back and forth from sitting in a news studio, wearing a very colorful suit, to floating around in his swimming pool and getting a tan, shares with us both tantalizing gameplay footage and specific info from various insiders. I could do an entire post just on this video, as it is so delightfully silly, with stuff like a woman claiming to be Diddy's jilted sweetheart crying, "I miss my monkey!", an adventurer who got caught up in the action and ended up in a full body cast (breaking something you shouldn't be able to break, according to Tillman), and an irate Nintendo insider who's forced to answer questions while trying to take a dump in a restroom stall. My favorite moment is when Frank Fontaine, a rookie reporter, reports on the different vehicles available to the players and how, in Versus mode, the players could mix up the vehicles they each use. He starts running through the combos but gets caught up in an endless loop and becomes more and more manic about it until he keels over. Seriously, you should check out this promo on YouTube, as it defies description.
In any case, as funny as the video was, the gameplay footage and info about the story and mechanics were more than enough to make me decide this was something I absolutely had to play, as it looked like Mario Kart 64 but done better than it already was. I got a chance to rent it before I ended up getting it that Christmas and that little taste was enough to tell me that this was a game to own. Not only did it have the racing action of Mario Kart but it also had much more replay value, thanks to its fairly sprawling Adventure Mode. And while I didn't think the Multiplayer Mode was quite as good as in Mario Kart 64, it certainly offered a little more variety, as you could say about the game as a whole, and my friends and I really enjoyed either playing it or taking turns in the Adventure Mode. Like a lot of the games I played in my childhood and into early adolescence, it was definitely frustrating at times and caused me to have a number of angry tantrums that I got yelled at for, but, man, was it rewarding when you finally succeeded. Going back to the game after not playing it for so many years, I won't lie about the fact that I was rather rusty and it took me a while to get back into the swing of things. But once I did, it all came back to me about how much I loved it as a kid, and I still think it's awesome and challenging enough to keep you coming back again and again.
Though you only get vague hints about it in the game itself, the plot of Diddy Kong Racing's Adventure Mode, as outlined in the instruct manual and Nintendo Player's Guide, is that Timber, a young tiger cub, has been left in charge of his island home by his parents, who are off on vacation. He invites his friends over and they plan to have some fun, organizing a big race, but it's interrupted by the arrival of Wizpig, an alien racing wizard who intends to take the island over, having already conquered the tracks on his own planet. He brainwashes the island's four guardians, making them his henchmen, and turns the place's best racer, Drumstick, into a frog. Needing help to banish Wizpig, Timber recruits other island natives to challenge him in a series of races. He also contacts his friend, Diddy Kong, who recruits some volunteers in the struggle to take up the alien's challenge and send him back to where he came from.
The reason why Diddy Kong Racing came virtually out of nowhere the way it did is because it didn't find its identity until just a few months before it was scheduled for release. After the release of Killer Instinct 2 in 1996, the team at Rare behind it was split in two: one half working on Killer Instinct Gold, the game's Nintendo 64 port, while the others were tasked with developing a new racing game for the console. They initially intended for it to be Pro-Am 64, sort of a remake of R.C. Pro-Am, an NES game that Rare developed back in 1988, only this would center around tricycles rather than radio-controlled cars, like the original. But then, Banjo-Kazooie, which was meant to be Rare's big Christmastime release for the N64, was delayed until the following summer (I can remember first reading about that game in a Nintendo Power issue focusing on upcoming games, which stated that it was expected to come out around Thanksgiving in 1997, but then, nothing more came of it). With that slot now open, they decided they needed a high quality game to fill it and that Pro-Am wouldn't attract much of an audience. Instead, they wanted to make a game that would compete with Mario Kart 64 and would feature their original character of Diddy Kong. Amazingly, by the time they settled on the star character and concept, they only had around five months to complete the entire game, with fourteen people in total working on it. And yet, not only did development go quite smoothly, but when the game was released that November, it proved to be an enormous hit and was critically acclaimed, when it could've easily come off as a rushed, cheap budget title.
%20-%20YouTube.png)
What makes the game stand out from other racing titles, particularly the Mario Kart series, is its one-player campaign called Adventure Mode. Here, after choosing your character (you get to choose a different one every time you come back to it, instead of being saddled with them for the duration of the playthrough), you use Timber's Island as the main hub to access one of four worlds. Each world's door is found somewhere on the island, some out in the open and others move hidden. You need to collect a certain number of Golden Balloons to access each one, as well as its
individual race courses. Each world has a lobby housing doors to four tracks, a locked door containing a special stage called "T.T. Challenge," the key to which is hidden on one of the tracks, and a spot containing an empty trophy case where you can enter the world's Grand Prix. After you complete the individual races, you race the Area Guardian, and once you beat him, you participate in the Silver Coin Challenge, where you go back through the tracks, which now each have a higher number of Golden Balloons necessary for access, and collect eight silver coins scattered across them, as well as come in first place. That completed, you face the guardian again in a much tougher race, and if you succeed, you win a piece of the Wizpig
%20-%20YouTube.png)
Amulet, as well as access the Trophy Challenge. Once you've gotten all four pieces, you're able to challenge Wizpig himself. At the same time, completing those T.T. Challenges gives you pieces of a T.T. Amulet, which you need to need to complete in order to finish the game fully. Once you do, you get the choice to play Adventure Two Mode, a harder version of the normal mode where the courses are mirrored and the silver coins appear in different, even harder to reach spots (there's also a code to unlock a co-op Adventure Mode). Finally, once a world has been cleared, you can go back to the various courses and, for the most part, run them again with new vehicles, as well as attempt a Time Trial.

Tracks Mode is the Multiplayer section where up to four players can either race each other on the individual tracks, compete in the Trophy Challenge, or even face off in the T.T. Challenges. Each track and challenge only becomes available once it's been unlocked in Adventure Mode, and while you can mix and match vehicles when racing individual courses (at least, those that have more than one compatible vehicle), you drive the default vehicles during the challenges. Like I said in the introduction, my friends and I didn't play this Multiplayer mode quite as much as we did Mario Kart 64's, but I do have fond memories of us having fun when did.
Like with
Mario Kart 64,
Diddy Kong Racing forgoes the split-screen aesthetic for single player mode, and it also has some of the same C-button options, like using the top one to change the camera angle (you can shift from a wide angle to a closer one and one right behind your character's head), and the right button to change between a course map and a speedometer. In Tracks Mode, you press the bottom one to switch between a lap counter, a timer, and a banana counter, all three of which are displayed at the top of the screen, along with your placement, in Adventure Mode. Arrows
%20-%20YouTube.png)
also appear onscreen during a race as a signal to any turns, curves, and hazards that are up ahead. In the overworld hub, all that's displayed is your Golden Balloon counter and a map. The racetracks themselves are interesting in that, while all four in each world shares its theme, sporting similar types of terrain and settings, they're still different enough from each other to where, for the most part, you don't feel like you're racing the same track again and again. In fact, some of the tracks have routes that can only be reached by a vehicle other than the default, incentivizing you to race them again in
%20-%20YouTube.png)
Tracks Mode. Speaking of the tracks' designs, while the good news is that, unlike in the Mario Kart games, there aren't any spots where you can fall really far and need to be rescued, there are instances where you can fall off and have to get back on yourself, which is even worse. Also, some tracks have hazards like standing pools of water that, if you fall in them, you have to get yourself out of them. In both cases, it can take so much time that you might as well restart the race, which is an option you have and can use as many times as possible, without having to worry about running out of lives. And like with the Mario Kart games,
%20-%20YouTube.png)
there are consistent variables with all the racetracks, like Bananas you collect to increase your top speed (it tops out at ten); Zippers, which appear frequently on the courses, have different shapes to correspond with whatever vehicle you're driving, and are sometimes placed in spots where using them successfully can be tricky; helpful arrows on the courses that point the way; and different-colored balloons that give you various weapons and power-ups.
As bright and colorful as the first two Mario Kart games are,
Diddy Kong Racing absolutely trumps them both, almost always coming off as lush, cheerful, and pleasing to the eye. The only exceptions are the beginning of the opening cinematic, showing the head of Wizpig that's been carved into the island's mountain, and the initial race with him, but those are made just dark enough to get the point across without being totally scary. The character designs are very cutesy, often with big, friendly eyes, and the various creatures you sometimes see around the racetracks, be it
dinosaurs in one world or whales in another, always have placid, even kind of dopey, expressions. There are also objects like hay bales, snowballs, and buoys that have eyes all their own! Though the racetracks don't feel quite as expansive to me as in
Mario Kart 64, they're still well-designed and rendered in 3-D, with lots of nice details in the surrounding environments, and like I said, they correspond well to the worlds they feature in. The game also has very little distant fog and, while certain objects, like trees and bushes, were realized as pre-rendered, 2-D sprites, which are also "billboarded," the characters themselves
are complete 3-D models, something they couldn't get to work in
Mario Kart 64. However, the trade-off is that the game doesn't move nearly as fast, so there's not quite the same adrenaline rush. Personally, that's fine with me, as the game is full of twists, turns, and items that can be difficult to nab as it already is.
The game is full of cinematics and cutscenes, opening with a really fun one where all of the main characters are seen driving and flying around, getting into mischief, and showing off their various personalities. For instance, Tiptup the Turtle is seen having trouble with his cart and crashes offscreen, Bumper the Badger is flying his plane, when the engine blows out; Pipsy the Mouse runs circles around Tiptup; and Krunch the Kremling gets knocked on his back by Banjo. You get other constant cinematics like a pan around from the front of the starting line to the back of your

character at the start of each race (you can skip these after the first time), cutscenes of Taj the Genie giving you a Golden Balloon or some other prize after you finish a race or challenge (you can always skip these), cutscenes of the door to a T.T. Challenge being unlocked when you return to the lobby after finding the key, and so on. And while there's not a ton of spoken dialogue in the game, there are a few scenes, such as the one where you first meet Taj and when you talk to the Area Guardians, where you're told what you have to do next or just what's going on.
Remember how, in my review of Mario Kart 64, I said that the game proves its sound quality as soon as you switch it on? Well, that's another area where Diddy Kong Racing outdoes it. The opening bit of Diddy chuckling as he flies his plane around the Nintendo 64 logo is a low-key prelude to that introductory cutscene, where the game hits you with just how fun and lively it is, with the visuals combined with the characters' vocalizations, the sounds of the vehicles, and the energetic, peppy music, which changes slightly to correspond with the character who's onscreen. That carries on to the character select screen, where scrolling over to a specific character influences the music's sound, and into the game itself, where each character not only has their own distinct sounds and vocalizations but also their own vehicle horns! Besides the superb mixing of the sound effects and music during the race and challenges, the voices in the dialogue scenes, and the really fun and eclectic music score, but I also like the little audio details to the overworld hub, like the sounds of water running, the croaking of the frogs, the sound of either dolphins or whales when you go down near the beach area, and even Taj humming the music to himself as he walks around the meadow at the center. You can turn the music off in the Options menu in order to hear these sounds much more clearly, something that I did a few times when I was a kid.
%20-%20YouTube.png)
The controls are, as you would hope, very fluid and easy to get the hang of, although the individual vehicles have their own quirks you have to get used to, which I'll discuss in a bit. Like in the Mario Kart games, you can perform a Rocket Boost, or Jump Start, as it's called here, at the beginning of a race by hitting the accelerator at the right moment. Depending on when you hit it, you either pull off a normal boost, with an orange flame, or a super boost, with a blue flame. It's timed to how the words "GET READY" appear onscreen and then fade before "GO!" pops up and,
while I have an easier time with it than the Rocket Boost on the original
Super Mario Kart, I sometimes end up doing a normal boost even when I'm going for the super. Other times, I don't boost at all. And then, there are times where I really get the feel for the super boost and can do it just about every time. However, I have no problem in getting a super boost on the Zippers, as you just have to take your finger off the accelerator before you hit one. Again, the flame on the back of your vehicle determines whether or not you pulled it off, with normal boosts having a purple one and super boosts being green. Then, once the multicolored
%20-%20YouTube.png)
smoke comes out the back, it's time to hit the gas again. The brake also comes in handy, both to keep yourself from spinning out as well as making tight corners, and it's always best to try stay on the inside lane when you make a turn. Even the vehicles' horns aren't there just for show, as they can be used to call over Taj in the main hub and T.T. in the world lobbies. If there's one major drawback to the controls, it's that there's no reverse, which really sucks when you find yourself butting up against a large wall or other obstacle and can't get around it. Also, the hit detection for when you're trying to acquire items can be very precise
%20-%20YouTube.png)
to the point of maddening, as you'll be so sure you're coming at an item at the right angle, only to bypass it by just an inch or, even worse, go right through it. The Silver Coin Challenges are probably the worst offenders of this, especially since the coins are often placed on parts of the course that are already inconvenient for racing in the first place.
Naturally, the carts are the vehicles you'd be the most familiar with and they're the most constant default. Like in
Mario Kart 64, you can power slide using the R-button, and while it doesn't give you a speed boost, you'll find yourself using it a lot to get around tight turns without losing speed. However, if you hold the slide for too long, you'll spin out. You can also do a U-turn by holding the A- and B-buttons as you make the turn, as well as a "tilt turn" by holding them, along with the R-button. And though they can be harder to spot in the heat of the action than their water and air counterparts, Road Zippers are helpful in that they
always blast you in the direction your front wheels are facing, rather than the Zippers themselves, so you can safely approach them from angles. The only major drawbacks with the karts is that, as per usual, they slow down if they go off the track. Also, while you won't sink if you fall into water, getting to shore will severely slow you down. Like I said before, there are some instances where you might as well restart the race if this happens.
%20-%20YouTube.png)
The hovercraft is, without a doubt, my least favorite of the three vehicles. It works fine if you're playing as a heavyweight character, but for everyone else, it can often feel like you're floating in place without making any progress. Even worse, there are moments where you have to take the hovercraft on land, which can feel even more awkward, and you can't power slide (at the same time, going off-road doesn't slow you down like with the cart). Also, the controls are really finicky and it's hard to make turns without doing so too quickly and slamming into walls. A good way to get around this is using the R-button to make the
%20-%20YouTube.png)
hovercraft hop, which you'll find yourself doing a lot on long curves. The upside is that, not only are Water Zippers much easier to spot, but they automatically turn and boost the hovercraft in the direction they're facing, meaning you can approach from any angle without worrying about getting shot out in the wrong direction. Even better, they do this even if you enter them from their opposite side, instead of boosting you back the wrong way.
%20-%20YouTube.png)
The plane is a lot easier to handle and able to make the sharpest turns of the three vehicles. Besides allowing you to do so, the R-button, which you'd best hold down at all times, can also make the plane perform a loop if you tap it twice in a row, allowing you to get behind another racer, as well as possibly grab an item you missed or dodge an obstacle. You also get a speed boost when you complete the loop, and holding R on the second tap makes the plane fly backwards before straightening itself out. You can even do a barrel roll by tapping R twice while making a turn. And not only do the
Air Zippers function in the same manner as the water ones, but the plane can even make use of Road Zippers if you fly down at them and touch them. The only major drawback to the plane is that it really suffers from getting hit by projectiles or wiping out, as it crashes to the ground, causing you to lose speed and altitude, and it can take precious time to get yourself back up to speed.
.png)
When you first start the game, you have eight characters to choose from. Like with the Mario Kart games, they fall into several different weight classes, with their own pros and cons, as well as vehicles they're best suited for. As with Mario and Luigi in those games, Diddy Kong himself is a middleweight, as is Timber the Tiger (the initial intended protagonist before the game's final configuration). While both of their top speeds are rather low, their acceleration and handling, particularly in carts and planes, make up for it. Diddy's vocalizations consist of monkey-like laughs and grunts, as well as falsetto exclamations

like, "Whoo-hoo!", and, "Whoa!" Timber has a sort of kiddish, surfer dude voice, with exclamations like, "Yeah!", and, "Cool!", though when he gets hit or slams into something, he makes tiger-like growls. The lightweights are Tiptup the Turtle and Pipsy the Mouse, and while they each have the lowest top speeds and are practically useless in the hovercraft, they make up for it with the best handling and acceleration. Tiptup has an excitable, nasally voice and yells, "Hoo-hoo!", and, "Watch out!", though my favorite of sound of his is this aggravated yell he makes when he gets hit. Pipsy has a very high, cutesy voice but her vocalizations are often more excitable than overly girly. Conker the Squirrel (it's so weird seeing him here, where he was completely innocent and even cute, compared to what he would become when he finally got his own N64 game) and Bumper the Badger belong to a group called light-heavyweight, who

with some of the best top speeds and above average acceleration and handling. They work best with hovercrafts and planes. Conker has a high, Chip and Dale type of voice, and his vocals are very excitable laughs and exclamations (again, nothing like his voice in Conker's Bad Fur Day). Bumper sounds like somebody who just inhaled some helium and his vocals come off as excitable but with a neurotic twinge to them. Finally, the heavyweights consist of Banjo the Bear (put in there to help promote the still in development Banjo-Kazooie) and Krunch the Kremling, both of whom have the highest top speeds of the original eight but with the lowest acceleration and poorest handling. Krunch, in particular, is almost impossible to use effectively, with Banjo being a much better choice. However, they both tend to fare pretty well in the hovercraft. Nearly all of Banjo's vocalizations in Banjo-Kazooie, as well as the country bumpkin twang to his voice, actually originate from this game. Krunch has a gravelly voice and often lets out mocking laughs, as well as annoyed growls when he gets hit.

There are two other playable characters who can be unlocked late in the game. One is Drumstick the Rooster, who was put under a spell by Wizpig. Once you've completed all the races and challenges in all four worlds, including collecting both amulets and winning all four gold trophies, Drumstick appears in the main hub area as a frog with a rooster comb and who also clucks as he hops. You have to run over him in order to break the spell and make Drumstick a playable character. He's described in the instruction manual and Nintendo Player's Guide as the most experienced racer in the game, but when I finally unlocked him, I found myself disappointed. He's a heavyweight character, and has an even higher top speed than Banjo and Krunch, but his acceleration is no better than Banjo's and he handles only slightly better than Krunch. Drumstick's vocalizations are the expected chicken noises, which can get annoying,

even if you're the one controlling him. Finally, there's T.T., the anthropomorphic stopwatch you find wandering around in the world lobbies. In that capacity, he shows you your gameplay stats, and his voice is the one you hear throughout the races, saying, "Get ready!," "Go!", and, "Finish!", as well as naming both the world and course you're currently racing. For every course's Time Trials mode, there's a specific time that, once you beat it, T.T. will challenge you to race it again and beat his own time. Once you do this for every course in the game, he becomes a playable character. I must confess that I've never done this myself, as some of his times are ridiculously hard to beat, with some no longer than just over a minute. However, I've heard that when you do unlock him, he proves to be what I hoped Drumstick would be, as his top speed and acceleration are the greatest in the entire game, while his handling is more in the middle. T.T. has a high male voice and all of his vocalizations, even when he runs into something or gets shot, are overly happy.

The items you use are found within various colored balloons strewn across the tracks, and if you grab two or three of the same one in a row, you can power up your initial item. However, if you grab a different balloon before using whatever item you currently have, it will be replaced. For instance, the Red Balloons contain missiles, and if you pick up one, you'll get one, ordinary missile. But if you pick up two Red Balloons, you'll upgrade to a homing missile, and a further one will get you a pack of ten missiles. Regardless of the type, missiles are best used at close range, especially the regular ones. While the homing missile will lock onto whichever target you wish, it can still miss them if they go around a corner or if they manage to dodge at the last second. The missile packs will completely reload for every Red Balloon you

touch. Blue Balloons contain boosts that you can upgrade from orange to blue and finally, to purple, which is like a Zipper on steroids. It's best to use the boosts on a straight section of road, as they can be very hazardous when there's a turn up ahead. Yellow Balloons contain shields that you can upgrade from alpha to star and, finally, to lightning (or orange to blue to green), the latter of which lasts the longest. Not only do they protect you from other weapons and various hazards found on the courses, but any other drivers who touch your shield will spin out. Green Balloons contain items that you drop behind you to trip up your rivals and can be used by all three vehicles. One will get you an oil slick (or, if you're in the plane, a cloud of noxious gas), two will get you a mine, and three a bubble that detains anyone who runs into it for

several seconds. All of these items are most effective when placed around other balloons, bananas, or Zippers to make it harder for your rivals to collect power-ups, items, and boost of their own. Finally, Rainbow-colored Balloons contain magnets, which either pull you towards those you lock onto or, if you get three of them and obtain a green magnet, pull them to you. However, I rarely, if ever, collect enough rainbow balloons to get the green one, as I find them to be rather useless. They are pretty much useless on anything other than a straightaway and are easily hindered by obstacles, and even when you do get them to work, they don't pull you all the way up to your target, as you would think. Rather, they get you within a few inches and let you go, so they're not useful in my opinion.
Minor quibbles about the controls and some of the characters aside, if there is one major complaint I have with
Diddy Kong Racing: completely clearing each world is rather repetitive. This was one of the game's few aspects that did receive some criticism and, as much as I do love it, as an adult, I can't deny that the Adventure Mode can get a bit monotonous. Remember when I said that the tracks are different enough from each other to where you don't feel like you're repeating the same one again and again? That may be true in terms of their designs, but the truth of the matter is that you will have to drive each course in the game at least three times in order to get every item and complete each challenge, which include the initial races, the

Silver Coin Challenges, and the Trophy Challenges. Moreover, since the key to each world's T.T. Challenge is hidden on one of the courses, you'll have to run that particular one a fourth time (fortunately, you can return to the lobby once you've collected the key, rather than having to complete the race). You must do this in order to complete the game 100%. And on top of that, you have to race each Area Guardian twice, and you have to race Wizpig twice as well, though not in a row and under very different circumstances each time. In short, it's best not to try to complete too many of the game's challenges in one sitting, as you will get burned out.
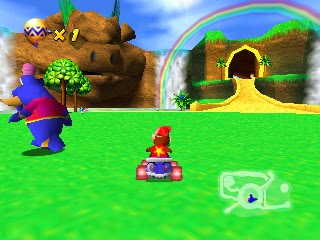
Timber's Island: More than just the main hub for the Adventure Mode, Timber's Island has some Golden Balloons, challenges, and secrets all its own. When you first start a new game, you meet Taj, the island's elephant genie, who will help you occasionally throughout your journey. As he wanders the meadow at the center, you can call him with your vehicle's horn, either by getting close to him and honking or doing so while standing on the large image of his face in the meadow. His main function is to change your vehicle, which you need all three of to fully explore the island, reach all four world lobbies, and collect the balloons found here and there on the island. The first balloon is
%20-%20YouTube.png)
floating in the tunnel leading to the first world, but there are others found on a ledge to the left of the Wizpig head, a ledge tucked behind a log bridge across from the entrance to Sherbet Island (both of which you also get with the plane), and at the bottom of a cliff at the end of the bridge, which you can get with either the plane or the hovercraft. At several points during the adventure, Taj himself will challenge you to a race around the island using each vehicle, the prize for each being another Golden Balloon. All races start in the meadow, with a line of red flags with the N64 logo showing the way. They last three laps like the normal races

but you don't have any bananas or balloons to help you out. The cart race is the simplest, as the course simply loops around the meadow. The hovercraft is trickier, as you have to go through a tunnel hidden behind a waterfall near the Wizpig head, head down the river past the entrance to Snowflake Mountain, cut through the bay containing Sherbet Island's entrance, and head back to the meadow. The plane challenge can be the hardest, as you take the same path as the hovercraft, only you go through the main tunnel leading to Snowflake Mountain. There are a lot of tight corners, and if you hit anything, it can slow you down long enough for Taj to catch up. Fortunately, if you lose a race, you simply have to go speak with Taj in the meadow to get the option to try again.
%20-%20YouTube.png)
If you drive down to the beach, you'll come across a billboard against the cliff-face, as well as a lighthouse at the end of it. The board starts out with a row of four question marks but, when you compete in the Trophy Challenges, each spot will display one of the trophies you've won. Once you've won the gold on all four of them and defeated Wizpig for the first time, you come down and touch the sign to set things in motion for the game's finale. Speaking of Wizpig, as you collect the pieces of his amulet, the big head of him in front of the meadow will turn from rock to flesh, section by section. Once the head is completely flesh, it laughs evilly and opens its mouth, which you fly in to finally face Wizpig for the first time.
Dino Domain: The first world is both the easiest to find, as it's at the end of the tunnel to the right of the Wizpig head (it's also where Taj emerges in the opening cutscene), and the easiest to enter, requiring only one Golden Balloon, which you're given immediately. The world's lobby is also the simplest in design, with the doors to the first three racetracks right in front of you when you enter, the fourth over to your immediate left, the Trophy Room further to the left, and the Boss and T.T. Challenges over to the right. And as you'd expect, the racetracks here are the easiest to beat, as they're the most straightforward, with three of them having the cart as the default vehicle. However, these tracks do give you your first taste of the turns and curves you'll be dealing with later on, and the fourth track is your first plane race. And yet, ironically, I find the T.T. Challenge here to be the hardest to beat, and the Area Guardian more annoying than some of the others.
Ancient Lake: Like the world itself, you only need one Golden Balloon to enter this course for the first time. It's also as simple as can be, as it's short, with gentle curves, plenty of bananas and balloons, and Road Zippers that are easy to hit. What's more, the key to the T.T. Challenge can be found almost immediately, hovering at the end of an off-track slab with the Rare symbol on it (though, you may need a Blue Balloon boost to grab it). The only real obstacle is a Brontosaurus who wanders around the last stretch of the course. While he's not hard to avoid, he can impede your progress if he steps on you. The level's Silver Coin Challenge, which requires six Golden Balloons, is also very easy, with none of the coins being that hard to grab. Heck, three of them line up along the first curve, and another two are found on the last curve. Finally, in Tracks Mode, all three vehicles can be used and the plane basically breaks the level altogether.
Fossil Canyon: Requiring two Golden Balloons to enter, the second track is just a little bit trickier, with some sharper turns, bumpier terrain, a dark tunnel, and a fork in the final stretch where the left, narrower path is the best one to take, as it costs less time. There are two Zippers that, when used in tandem, allow you to sail over a small pond early on, but if you don't angle yourself correctly or, God forbid, miss the Zipper, you can fall into the water and potentially lose a lot of time. On the plus side, there are, again, plenty of bananas, especially on the road that goes around the pond and easy to hit Zippers, and though there is another Brontosaurus here, he never walks across the road. The Silver
%20-%20YouTube.png)
Coin Challenge requires seven Golden Balloons and is also a little harder, with the coins positioned around some of the tighter curves and on both parts of the fork. The Zipper that sends you across the pond is mandatory for grabbing a coin that's on a sloping beach to the left of the tunnel's entrance. Again, all three vehicles can be driven here in Tracks Mode, though the tunnel makes using the plane really tricky.
Jungle Falls: Requiring three Golden Balloons, this is where the turns get tighter, while the track itself is narrower and more confined, especially when you come to a tunnel at the end of a bridge over a small pond. There are plenty of Zippers here, though this is where the game starts to place them in tricky spots like up against a wall or, near the finish line, inside a large dinosaur skull that you have to angle yourself at correctly in order to use it effectively. And just beyond the starting line are some fairly deep dinosaur footprints that can cause issues if you don't drive straight across them. As for the Silver Coin Challenge, which requires eight Golden Balloons, this is quite tricky, as
%20-%20YouTube.png)
there's one right past the starting line that you may have to wait until the second lap to grab; two coins on either shore to the left of the bridge across the pond, one that can cause you to fall into the water and another that can cause you hit the side of the tunnel's entrance; one underneath that dinosaur skull; and one right before the finish line that's in a very tight corner. Again, all three vehicles are available in Tracks Mode, and the plane allows access to a smaller tunnel above the main one.
Hot Top Volcano: Requiring five balloons, this is your first true taste of the plane in Adventure Mode and it can be pretty hairy if you haven't practiced with it in the overworld or in previous Tracks Modes. The main feature of this level is a long cavern with a river of lava running through it. It's opening is actually a fork of narrow tunnels and it contains a very tricky shortcut where you have to pivot the plane in order to get through a narrow passage, arches with item balloons underneath them, and stalactites that you can crash into if you're not careful with how you shoot through the Zippers. Beyond that is a straightaway with two more Zippers above a winding lava river and a
%20-%20YouTube.png)
roaming Brontosaurus, though he's not as dangerous to the plane as he was the cart. There are also Pterodactyls flying around in the first section of the track but they're no threat either. The Silver Coin Challenge, which requires ten Golden Balloons, forces you to take the long road in the tunnel, as well as fly over one of the arches, in order to get several of the first batch. You also have to fly to the right of a mesa just past the starting line to find the first one. In Tracks Mode, you can pilot the hovercraft, although that puts a lot of the items out of your reach.
Fire Mountain: The first T.T. Challenge is, like I said, the one I tend to have the toughest time with. Another level involving the plane, you have to swoop down to a pool of lava containing dinosaur eggs, pick up one of them, take it back to the nest with your image above it, and when it hatches, you score a point. You'll know it's hatched when the image of an egg below your picture on the screen stops flashing. The first one to hatch three eggs wins. Sounds simple, right? Well, what makes it difficult is that your opponents have a tendency to steal your eggs before they've hatched (they can't

pick them up once they do hatch) and take them back to their own nests. Granted, you can do the same to them, and it's advised that you do in order to win, but, man, is it nerve-wracking when you're either waiting for your latest egg to hatch, which takes a little bit, or hoping somebody steals an egg from a character who's about to win. And while new eggs pop up in the lava pool, it doesn't happen that often. There are item balloons that you can use against your opponents strewn throughout the arena, so once you have a third egg that's about to hatch, grab some missiles, plop the egg down in its nest, land, and blast anybody who tries to come by and fly off with it.
Tricky: Tricky the Triceratops is the Area Guardian and you have to race him along a path that goes up a spiral-shaped mountain, getting more and more narrow the closer it gets to the top. There are a fair number of Red Balloons strewn along the course that you can use to blast Tricky and slow him down long enough to pass him, as well as Blue Balloons allowing you to get a boost ahead of him. However, a lot of these balloons are placed alongside palm trees that can cause you to lose your lead should you run into them. There are also boulders that come rolling down at you at

some points and, as you get higher up, they start putting the balloons along the edge of the track or up against the cliff-face. It's really hard to stay on the inside of the path here, and if you fall off the ledge, you end up back in the lobby and have to start the race over. To offset this, there's a spot about halfway up the mountain where you can cut through a tunnel and use a Zipper to gain an impressive lead on Tricky. Even if he's in the lead the whole time, he'll slow down near the end of the race, but getting in front of him without getting flattened can be difficult. When you have your rematch with the Area Guardians, they're not only faster but the track itself now has more hazards. In Tricky's case, you have to deal with falling pillars
%20-%20YouTube.png)
during the first stretch of the race, forcing you to maneuver around them or try to boost past them and risk getting flattened. You also really have to go for every balloon you can in order to gain the lead on Tricky but, because of his speed and the narrowing track, getting around him without his crushing you is much harder this time. Needless to say, the shortcut really comes in handy during the rematch.
Snowflake Mountain: The way to the second world is pretty obvious: a tunnel up on a ledge to the right of the meadow that's covered with snow. Requiring two Golden Balloons to enter (which you should have far more than by this point), this world throws more obstacles at you on the courses themselves, and I'm not just talking about the ice and snow. It also ups the ante on the tight turns, different routes to take, and the airplane action, and the race against the Area Guardian is done with the, as yet, unused hovercraft, so you'd best practice with it.
Everfrost Peak: Requiring another two balloons to enter, this is the one course here where the plane is the default vehicle. The track is set mostly within a narrow, icy canyon, where most of the bananas and item balloons are found either down close to the ground or beside some trees that are hard to avoid slamming into. After a section where a river runs through the canyon, you go under an arch and head into a fairly narrow tunnel with a Zipper before a tight turn, then come out to a fork where you can either get one Red Balloon or two blue ones for a major boost. After an arch, there's one last Zipper before the finish line that you have to go into at an awkward angle to make it work. The Silver Coin
%20-%20YouTube.png)
Challenge, which requires ten Golden Balloons, isn't that hard, though some of the coins are placed in spots where it's difficult to grab them and use a Zipper at the same time, as well as on opposite sides of one of those annoying trees and both above and below arches, tempting you to grab both with a loop. Both the cart and the hovercraft become available for use here in Tracks Mode, and with the latter, you can actually make use of the lower Air Zippers by hopping into them.
Walrus Cove: Requiring three Golden Balloons, this cart level has a very magical, Christmasy sound to its theme music, as well as its environment, but that belies the fact that it can be a pain in the ass. It goes from a beautifully-lit but narrow, twisty tunnel to an enormous loop of ice that you automatically get a boost on (they put a Blue Balloon right before the loop, baiting you to immediately use and waste it), through another tunnel, a roadway that runs through the loop, a third tunnel, and finally out into the open again. All throughout, there are very tight turns that can make you miss the Zippers if you come around them too fast, especially through the canyon beyond the
%20-%20YouTube.png)
third tunnel. Once you're past the canyon, you drive along a patch of road with freezing water on either side. If you touch it, you just get bounced back, but that can cost you time. You also have another fork in the road to take, and while the left fork here is a lot narrower, if you go through it straight and make good use of the Zipper, you can use it as a shortcut to get ahead of everyone else. The Silver Coin Challenge requires eleven Golden Balloons and it is really tough, as the coins are, again, placed in tight turns that make them hard to grab and sometimes force you to skip the Zippers. There are two that are right on the water's edge, with one sitting between it and a tree, a
very narrow spot to squeeze through. The hovercraft becomes available in Tracks Mode and you can go right through the water with it.
Snowball Valley: Requiring six balloons, this is one is pretty short but it's also the most annoying course yet. Immediately, you come to a fork, forcing you to choose between either an icy, narrow tunnel or an open corridor with frozen spots of water on either side, each one with bananas in front of it. After you take whichever route you decide on, you enter the valley itself, hitting a Zipper before an arch that blasts you into a spot where enormous snowballs come rolling downhill, threatening to flatten you. You can either avoid them or use a shield from one of the balloons below the arch to protect yourself. After that, you go through a narrow, igloo-shaped tunnel and come
%20-%20YouTube.png)
out to a Zipper and more balloons before reaching the finish line. The fourteen-balloon Silver Coin Challenge can be similarly annoying, as they put the coins on the edges of the frozen water, in an awkward spot before the arch that costs you some time to get, on both sides of the area with the snowballs, and in the icy tunnel. This course also contains the key to the T.T. Challenge, which is hidden in an alcove to the left of the starting line. And like before, the hovercraft becomes available in Tracks Mode and it makes the immediate right path easier to get through.
Frosty Village: This nine-balloon track is definitely the most difficult one so far. Not only is it quite long, with a number of sharp turns and curves, especially in the second and third tunnels you have to go through, making it hard to hit the Zippers, but after the second tunnel, there's a foggy stretch with S-curves where it's really easy to run off the track. There's another tunnel beyond that, leading to a track with a Zipper along some freezing water and an arch before the final stretch to the finish line, with bananas and another Zipper placed along the shore. And as you can guess, they take full advantage of these annoying features to make the Silver Coin Challenge, which requires
%20-%20YouTube.png)
sixteen balloons, especially difficult. This is one instance where you can't get all of them in one lap, as there's one on either side of the enormous arch you come across immediately, another between two of the three houses at the bottom of the hill beyond it, others placed in those sharp curves, and, naturally, one right at the water's edge before the finish line. All three vehicles become available during Tracks Mode, and while the plane is at a disadvantage because of the low, narrow tunnels and the lack of Air Zippers, the hovercraft can make use of a shortcut behind the waterfall before the finish line.
Icicle Pyramid: This is one of the easiest of the four challenges, as it's a battle between you and four other characters in this three-level pyramid made out of ice. You start on the second floor, which consists of an ice platform surrounded by a tunnel, but you can fall off the edge of the platform and end up on the bottom floor. This floor, consisting of a big, open area, also has a tunnel around the perimeter, as well as paths leading back up to the second floor. The third floor is much smaller, consisting of a little road along the perimeter, with a big hole in the middle that will drop you back down to the second floor. There are red, green, and yellow item balloons strewn
%20-%20YouTube.png)
throughout the pyramid, and you use them to blast your opponents. You each have eight bananas acting as your hit points, and you lose two every time you take a hit, meaning you're through after getting hit four times. The best strategy is to stock up on shields, sit back, and watch the computer opponents battle each other, as it's sometimes hard to pinpoint exactly where everyone is on the map in the corner of the screen. Then, you can hunt down and take care of the one that remains. Incidentally, this arena is one of the most fun in multiplayer mode.
Bluey: The Area Guardian for Snowflake Mountain is a big, blue walrus wearing a section of a tuxedo on his neck. You race him in a hovercraft and in a manner that's the opposite of going up against Tricky, as you're perpetually heading downhill, through icy, snow-covered valleys full of rolling hills and trees, and very narrow tunnels. If you choose a heavyweight character and then get a super boost at the start of the race, it's actually quite simple, as you just have to avoid slamming into the walls in the tunnels or hitting the trees; if Bluey gets ahead of you, it's tough to get around

him, as you have to wait until the two of you are in a wide, open area, and item balloons are very scarce here. It's best to try to go for the blue ones and wait until the opportunity arises to boost past him. As for the rematch, the big difference is that, in the stretch before the second tunnel, those big snowballs from Snowball Valley come rolling in. They're actually not that hard to avoid: just stay in the center and make whatever adjustments you need to avoid getting squashed.

Sherbet Island: Requiring ten balloons to enter, the third world is located on a small isle in the bay down by the beach where the lighthouse is. Though it's best to either use the hovercraft or the plane to reach it, you can actually slowly but surely plod through the water in the cart, though I don't why you'd do that. In any case, with its beach and pirate-themed courses and challenges, this is, as you can guess, where the hovercraft really comes into use. This is also where the game really starts to ratchet up the difficulty, not just with the predominance of the hard to handle hovercraft but also with the sharpest turns and hardest Silver Coin Challenges yet for the cart, as well as a very annoying Area Guardian, especially during the rematch.
Whale Bay: This first course, requiring ten balloons, is very short and, if you're piloting the hovercraft with the right type of character, not too difficult. There's a spot right past the starting line where you have all five different item balloons lined up in a row, and another row of Blue Balloons behind the waterfalls to the first row's right. After that is a beached pirate ship that you can either go around and collect a number of other balloons underneath a rocky cove over to the far right, or you can use a whale that comes up behind the ship as a stepping stone to its deck. Then, there's a tight turn with a Zipper and a home stretch to the finish line, where another whale comes up
%20-%20YouTube.png)
now and then. Fortunately, you can go right through him without worrying about crashing. The Silver Coin Challenge, which takes seventeen balloons, isn't too hard at all, although it does force you to bypass the pirate ship shortcut to go for a coin in that cove, and they place the first coin in front of a Zipper at the starting line that's hard to get when the race first starts. And this is the first course in Tracks Mode where the default vehicle remains the only playable one (as is the case with all hovercraft courses).
Crescent Island: Now this one, where the default is the cart, is a lot harder. At the start, there's a fork where you decide between either a large, open tunnel with uneven ground and a bunch of balloons or a narrow but straight path with a Zipper. Either way, beyond that is a large, open clearing with a tight turn at the end that leads to another shipwreck. You have to drive up the gangplank, turn sharply to the left, and drive through its twisting, curving interior. Before the opening, there's a small ramp that leads up to a small hole you can fall through as a sort of shortcut, although I find it's more trouble than it's worth. Beyond the ship is another tunnel with a Zipper, and the
%20-%20YouTube.png)
tightest turn yet around a rock column before the finish line. There's a small bit of space between the column and the wall that you can squeeze through but it's really hard to do that after getting the Zipper. The Silver Coin Challenge, requiring eighteen balloons, is also very difficult. As you'd expect, not only do they put one coin in the tunnel and two on the narrow path at the start, but they also put one off to the right side, among the palm trees in the clearing, to the left of the gangplank, in the center of the hole at the top of the small ramp, to the left of the entrance to the last tunnel, and, most sadistically, in that opening to the right of the
column. (They only get more evil from here.) In Tracks Mode, the hovercraft becomes available, and it allows you to completely bypass the pirate ship by going around it in the bay. Also, it allows you to find the key to the T.T. Challenge, which is in a little nook far offshore from the fork just beyond the starting line.
Pirate Lagoon: Back to the hovercraft, this course, which requires thirteen balloons, is basically a trickier version of Whale Bay. There are small sandbars in the first stretch, a tight turn to the left beside a long sandbar with bananas lining it, a castle tunnel at the end of a big, wide bay that you have to hop into while turning left at the same time, before doing the opposite while exiting in order to get into a Zipper, and another sharp turn to the left shortly before the finish line. There's a reef right before the finish line comes into sight and you can rocket over it using a Zipper and ramp.
%20-%20YouTube.png)
The twenty balloon requiring Silver Coin Challenge is also tough, as they place a lot of those coins either on the inside of those tight turns or force you to go far out of your way, as one of them is located off to the far right of the wide bay before the tunnel. And, as you'd likely expect by this point, the last two coins force you to bypass the shortcut over the reef. Again, this is a level where the hovercraft remains the only available vehicle in Tracks Mode.
Treasure Caves: Judging from the last course, you're likely expecting this, which requires sixteen balloons, to be an even harder version of Crescent Island. Believe it or not, it's much easier, as the course is more wide open and the curves and turns not nearly as tight as they have been. The only part that's kind of tricky is this large cave about 3/4 in that contains a lagoon which can seriously slow you down if you fall into it. Again, the track isn't that twisty, but the lighting and mist effects can make it hard to see the boundaries, and the Zipper here makes falling in more likely. Similarly, the

Silver Coin Challenge, which requires 22 balloons, is pretty easy, although there are coins placed on the edges of the lagoon that could cause you to fall in, and it does require you to choose between the left and right sides of the track from one lap to another in order to get them all. All three vehicles become available in Tracks Mode, and while the hovercraft allows you to easily zip through the lagoon's waters, the plane allows you to reach a high uo tunnel past the starting line that contains a line of bananas and a Zipper at the end.
Darkwater Beach: This is another battle royale, like Icicle Pyramid, with the same rules applying. The difference is that you're piloting hovercrafts in a big, wide open stretch of beach, with sandbars, little isles, and an arch containing Red and Green Balloons. The only bit of cover is beneath one of two larger isles with tunnels running through them, one of which houses a Yellow Balloon. But, like Icicle Pyramid, this stage isn't that hard, and you can stock up on weapons to blast your opponents or hide in the tunnels and wait to ambush them. One of the best strategies is to get on top of one of the isles with the tunnels, giving you a wide view of the arena, and blast your opponents using the constantly spawning Red Balloon that appear right next to you.
Bubbler: Oh, God, I hated this asshole piece of calamari when I was a kid! It didn't help that the first time I attempted to race him, it was when I'd rented the game and whoever had it before me had unlocked the rematch, which is really annoying. The initial race isn't so bad, though. Unlike the past Area Guardian challenges, this one involves laps, as you race Bubbler around a small island, with the course consisting of a curving tunnel, past little isles with palm trees that, as always, you can run into, and annoying logs that spin you around in place if you run into one of them. What makes
%20-%20YouTube.png)
Bubbler himself especially annoying, aside from the constant, distorted yells he makes, is that he leaves mines in his wake, often in spots where they're hard to avoid, especially in the tunnel. While you'd think it would be best to get ahead of him immediately with a Rocket Boost, he's likely to catch up and swamp you as soon as your boost wears off, unless you can quickly grab one of the Blue Balloons, which are placed just a bit off the track, and get another boost. Red Balloons also feature in this race and, while Bubbler is hard to hit with normal missiles, homing ones can easily slow him down and allow you to pull ahead. The best

place to do this is the wide open stretch leading to the finish line, which has a couple of Red Balloons placed on small isles, albeit across from each other. Again, this first race isn't so bad. The rematch is where you'll want to punch your TV, as Bubbler, besides being faster, now decides to live up to his name and leave behind bubbles. He leaves one right beside a Red Balloon in the tunnel, forcing you to hop along the side of the wall in order to get at it (which is hard to do without sliding into the bubble), and at the end of the tunnel and other spots, he leaves three bubbles in a perpendicular line to you and you have to pray the center one pops quickly so you don't have to slow down. Very aggravating, especially if you try it without a heavyweight character, and it takes a lot of practice, but once you beat him, it's so satisfying.
Dragon Forest: The last course on Timber's Island is actually hidden in plain sight, behind one of the waterfalls to the left of the Wizpig head. Requiring sixteen balloons to enter, this medieval-themed world, consisting of villages, castles, and the like, is where the game pulls out all the stops and becomes merciless. The twists and turns are tighter than ever, the Silver Coin Challenges are especially difficult (one track has possibly the worst one in the whole game), and the Area Guardian is the toughest boss you face before Wizpig, even during your first race with him.
Windmill Plains: The first track, requiring sixteen balloons itself, is a plane level and it's probably the easiest in Dragon Forest, although that's not saying much. It's quite long, opening in a spot with two windmills that you can either fly around or go under to take advantage of the Road Zippers and the Rainbow Balloons, leading to a Zipper you use to boost yourself towards a cramped tunnel with a low ceiling, which opens up into another spot with a lone windmill. If you're skilled enough, you can use both the Air Zipper in front of it and a Road Zipper beneath it. Beyond it is a big, wide open area with water on either side of a track, and a waterfall to the far left, a long, wide canyon with high walls, and another spot where you boost
%20-%20YouTube.png)
yourself to a cramped tunnel before coming out at the finish line. While not inherently difficult, there are many spots where you can crash and those wide open areas make it very easy for your opponents to hit you with missiles. The Silver Coin Challenge, which takes 23 balloons, really forces you to go off the beaten path, bypass Zippers, and go under the windmills in order to collect them all. The worst one is hidden behind the waterfall in the one area and it's hard to get without slamming into the cliff behind it. All three vehicles are available in Tracks Mode, with the hovercraft being able to hop into some Air Zippers and cut through the wide open area with water.
Greenwood Village: Requiring seventeen balloons, this is definitely one of my least favorite courses in the game, as it's so freaking difficult that it borders on unfair. They really went overboard on the tight turns here, especially in the last stretch, where you have the option to use a Road Zipper to boost yourself from the corner of one tunnel to another, then go through several sharp S-curves as you exit and make your way back into the village, and finally go around one last tight turn on the inside in order hit a Road Zipper before the finish line. Even with the lightweight drivers, it's hard to make these turns without braking to avoid hitting the wall (I once made the mistake of attempting this course with Drumstick; I never won, and I was
%20-%20YouTube.png)
playing for so long that my fingers began to blister!). That's to say nothing of a bumpy patch of road that runs through the woods beyond the village and an alternate path to the second tunnel that's so ridiculously sharp in its angles that it can't be called a shortcut. There is a shortcut early on, where you can drop the well in the center of the village and use a tunnel that shoots you to the spot where the course opens up into the woods, but you have to angle yourself correctly when you fall in so as not to lose time. And that's just talking about the initial race, though. The Silver Coin Challenge,
%20-%20YouTube.png)
which requires 24 balloons, is a prime candidate for the hardest one in the enter game. While you normally can pick up all the coins in one lap or two and then concentrate on winning the race, here you will have to spend all three getting them. The developers must've been feeling particularly sadistic, as they put these coins in the worst possible spots, often in the center of these tight turns or just beyond those corners that send you to the opposite side. There's a coin on the left wall of the long tunnel beyond the village that is really annoying, but the worst one, by far, is the one placed in that awful, alternate tunnel leading into the last one. No matter how skillful you are at this, you're going to lose time. It's a massive headache, and in Tracks Mode, the hovercraft becomes available, but it sure doesn't make the course any easier.

Boulder Canyon: Requiring twenty balloons, this hovercraft course isn't as hard as Greenwood Village, but it's still really challenging. Not only are there more tight turns and annoying logs to get in your way, but you spend the middle of the course out of the water, going through a tunnel and heading across a drawbridge to a castle. There's a bell on the left side of the entrance and if you touch it, the bridge will rise up behind you. But it's harder to get than you'd think, as the hit detection is very precise. This bridge also leads to the key to Dragon Forest's T.T. Challenge but it's the hardest one to get, as you have to hit the bell, turn around so that you're facing the bridge, which is hard to do in the hovercraft, and use a nearby Blue Balloon to boost
%20-%20YouTube.png)
yourself up to the ledge where the key is and then hop to it. This isn't helped by the fact that the bridge may begin to lower while you're doing this, forcing you to start over. Getting back to the actual course, beyond the drawbridge is a tunnel with a couple of sharp turns that lead into a sewer system with a fork in the road. Each path, containing either a Red or a Green Balloon, leads back to the river, but the right one puts you farther ahead and allows you to make easier use of a Water Zipper. You still have to get past a couple of more logs and use another Zipper to head down a slope in the river
%20-%20YouTube.png)
before reaching the finish line around another corner. The 30-Balloon Silver Coin Challenge has you having to navigate carefully around the logs and skimming the sides of the water in order to grab some of the coins but, fortunately, they don't force you to go through each branch of the fork; rather, both coins here are on the left branch. And like the hovercraft courses in Sherbet Island, it remains the only playable vehicle in Tracks Mode.
Haunted Woods: This course, requiring 22 balloons, is similar to Greenwood Village in that it involves driving through a medieval-style village and a rough stretch of course that runs through the woods, and you also go through a castle similar to the one in Boulder Canyon. There are more tight curves here, with the opening forcing you to choose one of two paths around a fountain, more tight corners heading through the tunnel beyond and into the woods, and S-curves in the castle before you reach the finish line. However, it's much shorter than the other Dragon Forest tracks, and I find it to be not nearly as difficult as the two previous ones. Also, the woods and castle are indeed haunted by ghostly, floating heads of
%20-%20YouTube.png)
Wizpig, but despite the spooky sounds they make, they're just there for show. The Silver Coin Challenge, requiring 37 balloons, is a bit tough, as they put two coins on the fountain's right side and another on the left, two more on the inside of the curve in the woods, and others that force you to skip Zippers, but compared to Greenwood Village's challenge, it's nothing. And like with Greenwood Village, the hovercraft becomes optional in Tracks Mode, allowing you to cut right through the fountain.
Smokey Castle: Named after the Area Guardian, this last T.T. Challenge is akin to Fire Mountain, only it's much easier. The object of the game is to collect ten bananas and dump them in the wooden bin with your character's face above it in the castle interior. Bananas can be found on the drawbridges leading across the moat and on the road that circles the castle (there are bananas in the moat itself, but they're too much of a pain to bother with), and they continually respawn. You can only carry two bananas at a time, but unlike the eggs in Fire Mountain, they can't be stolen once you place them in the bin. There are item balloons scattered across
%20-%20YouTube.png)
the course so you can blast your opponents and make them drop their bananas, but you don't get weapons that give you too much of an advantage, like the missile packs (it was the same way at Darkwater Beach). Honestly, the computer is so easy to beat that you're better off concentrating on getting bananas rather than stealing them, and only use the weapons to defend yourself when necessary.
Smokey: Fittingly, Dragon Forest's Area Guardian is a classic, fire-breathing dragon (who sounds a bit like Arnold Schwarzenegger). Unfortunately, he's, by far, the toughest of the four. The difficulty comes both from Smokey himself and the course. Like Bubbler, as you race him for three laps, Smokey leaves behind obstacles in his wake: in this case, puffs of fire-breath that float in midair and will immediately down your plane if you touch them. Moreover, the course often makes it hard to avoid them, especially the tunnel the two of you fly through at the start, which is very narrow and winding, with small spaces in between stalactites

and stalagmites that contain item balloons. Beyond that is a windmill that, despite containing a Blue Balloon in the hole in its base, can really slow you down if it hits you with its sails, and flying around it isn't any easier. Next is a wide valley where it's best to stay on the inside of the track so as not to lose time, and the final stretch is made up of a short, curved tunnel and a pair of open plains with spots of trees. Red and Blue Balloons are placed sporadically here, so you can either upgrade to homing missiles to slow Smokey down or upgrade boosts in order to blast past him. During the rematch, Smokey leaves behind more puffs of fire breath, making it easier for you to crash while trying to get around them. Ergo, it's a good idea to pass him as early as possible and then keep the lead.
Wizpig's First Strike: Once you've completed the Wizpig amulet and exited Dragon Forest (or whichever world you happen to be in), the now totally flesh head of him in the center of the island will laugh and open its mouth, meaning it's finally time to face the big guy. When you fly into the mouth, you get a cutscene of Wizpig laughing evilly in the midst of a thunderstorm, declaring that you can't beat him, before he swoops in and lands in front of you at the starting line. Like with Smokey the Dragon, the reason why this race is as difficult as it is has to do with both Wizpig himself and the course you're racing. Not only does Wizpig
%20-%20YouTube.png)
live up to his name and constantly hog the road, threatening to either trample your or knock you off the side, but, even if you successfully get a rocket boost at the beginning of the race, you'll only keep your lead for a few seconds, as he'll either run or fly past you. In fact, it's impossible to keep ahead of him for the entire duration of the race, especially since there are no item balloons to help you; only Zippers. The Zippers are actually mandatory for winning the race at all, as the circular track you're on has numerous spots of standing water, and if you a miss a Zipper and fall in, you might as well

restart. Naturally, the Zippers are often placed in spots where they're hard to reach, with the absolute worst spot being 3/4 of the way through, where you have to hit one that's in the left corner of one piece of land, then make sure you're properly angled to hit the next one at the end of the next strip, and do the same again, only much quicker. The frantic speed of the race and the poor visibility from the raging thunderstorm make what would be an already tricky task even tougher to pull off. And because of Wizpig's tendency to always catch up, it's best that you wait until the race is almost over to finally make your move. What's cool, though, is that if you can stay directly in front of him when he catches up to you, he'll unintentionally give you a boost, though you have to be careful about where you're facing when he does.
%20-%20YouTube.png)
When he loses, you're treated to a cutscene where Wizpig stomps his foot and cries like a big baby, before disappearing. The storm leaves with him, and both Taj and T.T. join you, the latter declaring, "Let's party!" That's what you see next: all the characters partying and having fun down on the beach by the lighthouse. But then, Wizpig peeks out from behind the lighthouse and barges in, sending everyone running while laughing and declaring, "Sorry to break the party, worms, but I had to say goodbye!" Not only does he chase the characters around, his spaceship flies in on autopilot and fires laser blasts at them, before he
%20-%20YouTube.png)
decides he's had enough fun and teleports up into his ship. The ship rockets off into the sky and Wizpig yells, "See ya later, worms!", before laughing one last time. You then get the ending credits but, as the question mark after "THE END" should tell you, the adventure isn't over yet. (The Nintendo Power Player's Guide used some screenshots from this cutscene in their synopsis of the story and, as a result, I thought I'd missed something that played at the beginning of every new game file, either by pressing a button or doing some other action. It wasn't until I beat Wizpig for the first time that I realized where these shots came from.)
Future Fun Land: Once you've won the gold on all four Trophy Challenges, you can take the fight to Wizpig's home planet. If you drive down by the beach and touch the billboard, you get a cutscene where the lighthouse is revealed to be a rocket-ship that blasts off and lands you in the lobby to this, the game's true final world. Like the other worlds, you go through the four racetracks twice: once to beat them and again for the Silver Coin Challenge. This time, you go straight from one to the other, and they also become available for replay in Tracks Mode. While there's no T.T. Challenge, once you've won the others and completed the T.T.

Amulet, as well as collected all 47 of the game's Golden Balloons, you're able to have a rematch with Wizpig (there is a Trophy Challenge here, but it's not necessary for the rematch). Needless to say, this last batch of levels are about as difficult as it gets, especially in the Silver Coin Challenge. And the rematch with Wizpig? If you thought the first race was challenge, it doesn't have a patch on this, which will really have you screaming at the top of your lungs.
Spacedust Alley: Requiring 39 balloons, the first course is, admittedly, easier than what comes next, but it gives you a taste of what you're going to face. Immediately, there's a small asteroid floating around that you have to dodge, followed by a C-shaped stretch of track with two Air Zippers and bananas lining the ground below. Also, even on another planet, there are palm trees that you can slam into if you're not careful. Following that, you go through a tunnel with arcs of electricity passing through at various heights (these things will be the bane of your existence in the rematch with Wizpig), and beyond that is a spot where a spaceship comes down and fires laser blasts at you. Fortunately, if you stay in the center, you won't get
%20-%20YouTube.png)
hit. The next section has a bridge with a triangular shaped energy field above it, leading into a winding tunnel full of those stalactites and archways with item balloons between them and the wall, before you come out to the finish line. There is another entrance to this tunnel underneath the bridge: a small, rectangular one with an Air Zipper in front of it, allowing you to collect bananas and bypass some of it. The 43-balloon Silver Coin Challenge is where it feels like the game designers are trolling you, as they put the coins in spots like above one of the electric arcs in the first tunnel, off
%20-%20YouTube.png)
to the sides of the exit in the spot where the spaceship comes down at you, and in the midst of that energy field above the bridge, forcing you to risk getting hit and crashing. The only upside is that none of the coins are found in that final, winding tunnel; in fact, the last coin is located in the shortcut. In Tracks Mode, the other vehicles become available, and there are plenty of Road Zippers for you to use.
Darkmoon Caverns: 40 Balloons get you into this course, though you may end up regretting it, as it is murder to drive through. The first stretch is fine, but after that, you head down a fairly steep hill where you have to avoid laser blasts in one spot near the edge, go through a winding tunnel, come out on an uneven stretch where you have to dodge large craters, go through another tunnel with more tight curves, head downhill while dodging lasers blasts again, and come upon a big loop akin to the one back in Walrus Cove, followed immediately by another one, before finally going through one last tunnel to the finish line. It's a good thing this course has really cool music, as it would be completely unbearable otherwise, especially in the
%20-%20YouTube.png)
Silver Coin Challenge. Requiring 44 balloons, this one, no joke, has all the coins placed in tight corners, turns, and at the start of the two loops, which you can miss if you don't enter them at the right angle, and the tunnels before them can make that hard to do. The hovercraft becomes available in Tracks Mode, but the course's terrain really doesn't suit it.
Spaceport Alpha: This course, which initially takes 41 balloons, is about as difficult as Greenwood Village, especially in the Silver Coin Challenge. It starts off with a long alley with very high walls that curves around to a large opening with an Air Zipper up top and balloons down below. Beyond this is a spot where you fly over to the left and head down a U-shaped ventilation shaft that first curves sharply downward, forcing you to hold that R-button so as to clear the low-hanging ceiling, and then do the same when you reach a column of air that lifts you up, or you'll hit the edge of the shaft. They have the gall to put an Air Zipper over to the leftmost corner when you exit here, though it's not worth the aggravation. Next is an
%20-%20YouTube.png)
area based on the Death Star trench run, as you fly through this section that's long and wide, with more high walls and laser turrets firing every which way. There are a pair of Yellow Balloons at the entrance here to make getting through it easier, though the normal shield will run out before you make it halfway. If you miss them altogether, then it's best to stay low to the ground and try to enter the Air Zippers at their lowest points, as the lasers fire right at them. Following a short, curving, blue tunnel and similarly-shaped channel, you reach the finish line. But it's the Silver Coin Challenge,
%20-%20YouTube.png)
requiring 45 balloons, where Spaceport Alpha is really frustrating. Most of the coins float against the walls, and often along the curves, and they're so small that you can easily fly right past them without seeing them (I did that with one that's floating immediately past the starting line!). The second coin is along the left-hand wall of the long channel you first fly through, forcing you to really go out of your way, and after you come out of the ventilation shaft, you have fly to the right before the trench's entrance to snag another. However, the worst coins to grab are those in the trench, in
%20-%20YouTube.png)
particular one that floats near an Air Zipper along the right wall. There's another one at the top of the blue tunnel's entrance, which can be hard to grab since you're likely going to be flying low in order to dodge the lasers when you reach it. Besides the difficulty of grabbing the coins, having to come in first place as well really makes this frustrating, as several of your opponents can get far ahead of you while you're busy snagging them. All vehicles are available in Tracks Mode, and the cart and hovercrafts actually fare better, since they don't have to worry about the lasers.
Star City: The final course in the entire game, this one, which takes 42 balloons, isn't as hard as the two previous ones. You start on a stretch of desert-like road that goes through a rainbow-colored tunnel and leads to a ramp that stretches under a monorail track and leads to a big, silver sphere that I can only describe as looking exactly like Spaceship Earth at Epcot. Incidentally, you can fall off this ramp, and while it is possible to get back on it, you'll lose so much time that it's easier to just restart the race. In any case, after a tunnel, you enter Star City itself, which reminds me so much of how Coruscant looked during the speeder chase in
Attack of the Clones that I wonder if George Lucas saw this game at some point (there are also a
number of Eater eggs, including Rare's logo on some buildings, as well as a
Killer Instinct building). The roads here bend at 90-degree angles, forcing you to power-slide like mad to avoid hitting the curb and get the sporadic Road Zippers here. You eventually go up a hill, enter another tunnel, and come back out at the finish line. The Silver Coin Challenge, which requires 46, i.e. all but one of the game's Golden Balloons, isn't all that touch either, although the first one does force you to get really close to the ramp's edge. While those scattered across the city streets aren't hard to pick
up with your power-sliding, the penultimate one, found in the left-hand corner at the bottom of the hill that exits the city, can be quite tricky. Again, all three vehicles become available in Tracks Mode, with the airplane having the advantage of being able to fly over the sharp turns in the city. That said, if you try to fly over the monorail track at the beginning, you might smash into the train itself when it comes by.
Wizpig Strikes Back: Once you've collected all 47 Golden Balloons and completed the T.T. Amulet, you're automatically taken through the T.T. Door in the Future Fun Land lobby, behind which is another door with Wizpig's image painted on it. Upon going through the door, you get a cutscene where your character is flying above the planet's surface, when Wizpig bursts through a cliff-wall, riding a rocket, and after flying straight up, comes down and meets you at the starting line. This final race takes all of the challenging aspects of the game, from tight turns and claustrophobic spaces to insane obstacles, and not only pours them all in but
%20-%20YouTube.png)
cranks them up tenfold. As soon as the race begins, you have to get around these two floating asteroids, then fly into a canyon, the first stretch of which is full of rock columns, more asteroids, and laser blasts coming down from the sky, and then arches stretching across a winding section that make it really hard to turn in time, as well as grab the Red Balloons below and above them. Beyond that is a long stretch that curves to the left, with water below, an electric field on the right, and on the left, another Wizpig face carved into the cliff. Atop the snout is a Blue Balloon, while a Red Balloon is below the chin, and before the next tunnel is

Wizpig's spaceship, firing lasers at you. The tunnel is where things go from hard to infuriating, as it's narrow and curvy, has rock columns you have to maneuver around, and arcs of electricity stretching across its width at various spot (even Wizpig himself can't avoid be zapped by one of them). Before the finish line, you pass through Wizpig's throne room, with laser blasts firing from every which way, and a column-shaped energy field protecting the throne itself. There is a shield right before the room's entrance, but it's behind a stone column and hard to grab, so your best bet to avoid getting zapped is to stay low, ignoring the item balloons found on either side of the throne. One
%20-%20YouTube.png)
last curvy tunnel and two more asteroids make up the path leading to the finish line. Yeah, this race sucks, and just like the first time, Wizpig is hard to get around and keep a lead on, and he can knock you off to the side and into hazards if he hits you. There's no other advice except to choose a character whom you can skillfully operate a plane with, dodge as best as you can, and
try as best as you can not to lose your cool, as I did many times when I attempted this as a young kid.
When you manage to defeat Wizpig, you get a cutscene where the rocket he's riding malfunctions and takes off into the sky at top speed. He flies at a nearby planet and crashes onto its surface, the halves of his rocket flying up and towards the screen. It cuts back to Earth and Timber's island, where another celebration is underway. The Wizpig head in the cliff has been replaced by a golden one of Taj, as he and a number of the other characters celebrate nearby in a conga line. The camera pans around to show the Pterodactyls from Dino Domain flying through the air, while Tricky the Triceratops dances across the meadow with two
%20-%20YouTube.png)
smaller Triceratops, a yellow one and a pink one, the latter of whom Pipsy is riding. Drumstick then comes flying in, Bluey and T.T. appear in the entrance to Snowflake Mountain, Conker comes flying by them in his cart and jumps down into the meadow, and Smokey the Dragon flies above the meadow, with Timber riding him (Bubbler never appears, strangely). Finally, Diddy comes flying by in with his plane, swoops around and passes by the golden Taj head, which the scene ends on. But, before the credits, we get one last clip of Wizpig's spaceship flying through the night sky, accompanied by his laugh, setting up for a sequel that, sadly, entered development a couple of times but never came to fruition.
David Wise, the composer for the Donkey Kong Country series, particularly the first two, did the music for Diddy Kong Racing, and it's just as memorable and eclectic as his work for that franchise. Like I mentioned at the beginning, the music for the cutscene is nothing but energetic, peppy fun and adventure, with each character having their own instrumental leitmotif that's carried over to when they're selected on the selection screen. Diddy has what sounds like a xylophone, Timber's is a harmonica, Bumper's is a steel guitar, Conker's is a whistle, Tiptup has a higher-pitched xylophone, Pipsy has steel drums, Banjo's, fittingly, is an actual banjo (as well as a kazoo), Krunch has an electric guitar riff, and Drumstick has a fiddle. When you first begin a new game file, the music starts out low and ominous, as you see the carved Wizpig head in the midst of a thunderstorm, but when the scene brightens up and Taj makes his first appearance, it does a 180 and becomes a light-hearted and hopeful version of the opening title theme, with an Indian-style slant to it for Taj. The latter type of music is retained whenever you speak with him on the meadow and during his own racing challenges. The main overworld of Timber's Island has its own theme, which is a peppy, joyous little bop that shifts slightly in sound depending on where you are on the island. In the main meadow, it has a xylophone-like accompaniment to it, as well as Taj humming it, but it becomes more oceanic when you drive down by the beach, and Christmas-like when you find your way to Snowflake Mountain. All of the world lobbies have the same sort of casual, electric guitar riff to them, while T.T. has his own, quirky kind of motif whenever you speak with him. One of my favorite parts of the game's soundtrack is this short but lovely and wondrous piece that plays whenever you complete one of the amulets, win the gold in a Trophy Challenge, or unlock a T.T. Challenge. It really makes you feel good about whatever you just accomplished.
As far as the courses go, Dino Domain is the only one where each stage has its own theme. Ancient Lake gets things started with a laid back, fun-sounding romp of a theme; Fossil Canyon has a sound akin to a fiesta with maracas; Jungle Falls has a more intense, faster-paced theme that can get you pumped up; and Hot Top Volcano, weirdly enough, has an exotic, Indian sound to it, with vocals speaking what sounds Hindi. All of the Area Guardian races have the same sound, which is this fast-paced theme that appears to combine all of the characters' motifs together, along with instances of people clapping to hype you up. The same goes for the T.T. Challenges, which has a theme that comes off as very competitive, albeit still with a fun vibe to it. Getting back to the race-courses, Everfrost Peak and Snowball Valley has an okay theme, but the ones I really like are for Walrus Cove and Frosty Village. Walrus Cove has this wonderful, upbeat, Christmas-fueled theme, with a melody that sounds like a cross between Here Comes Santa Claus and one of those songs that would play during the chase scenes on Scooby-Doo! Frosty Village has a theme that's a bit slower but still has that same feel. It makes you want to play this game around Christmastime. Switching to Sherbet Island, Whale Bay has a tropical theme that screams, "Surf's up, dudes!", Pirate Lagoon has a faster-paced but no less memorable and fun theme, and both Crescent Island and Treasure Caves have a similar sounding theme, with a touch of calypso to it. Over to Dragon Forest, Windmill Plains and Greenwood Village have a theme with an electronic beat that's accompanied by xylophones, while Boulder Canyon has a theme that starts out sounding kind of standard and electronic, but when you reach the castle in the course, it takes on a more medieval sound. Haunted Woods' theme has a delightfully spooky track that blends in well with the creepy sounds of the floating Wizpig ghost heads. As for Future Fun Land, while Spacedust Alley and Star City have a theme that's okay but not exactly amazing, save for instances of vocalizing, and Spaceport Alpha's theme is about as obnoxious as the course itself, Darkmoon Caverns has another theme I really love, which is this smooth, cool, yet also fast piece that has an awesome futuristic sound to it. It also plays during the initial ending credits when you first defeat Wizpig, as well as when you blast off to Future Fun Land using the lighthouse turned rocket.
As for Wizpig himself, he has a big, bombastic theme fitting for the overblown villain he is, and both of the races against him have the same urgent, frantic-sounding music where it sounds as if the future of humanity hinges on the outcome of this race. When he's beaten the first time, you get a repeat of his theme, which transitions into light-hearted celebratory music during the party, only to become menacing and then panicked when Wizpig crashes the party before taking off back to his own planet. The theme for his second defeat reflects how unexpectedly his rocket malfunctions and flies off with him, then gives a sense of how far out into space it takes him before he crashes. And the true ending has a celebratory piece of music that definitely lets you know that it's over and you can now sit back and relax.
Diddy Kong Racing is an often frustrating but ultimately fun and rewarding game to play. Besides how unfair the difficulty can get at points, with the Silver Coin Challenges and the Area Guardian races, and the fact that the Adventure Mode can sometimes feel repetitive because of how often you have to replay the various worlds' courses, everything else is just awesome. The game is very well-designed and a feast for the eyes with its bright colors, the characters are all memorable, the courses and challenges are often equal amounts fun and frustrating, with nice details in their designs, the controls work well, the characters and vehicles have their own individual pros and cons that allow you to figure out which work best for you and how best to tackle those vehicles you find tricky, the music is awesome, and even though my friends and I didn't play it that much, the multiplayer does have a lot to offer, especially with the option for each player to pick their own vehicle. If you have access to a Nintendo 64, you simply have to place this if you're a fan of the Donkey Kong franchise or of Rare. You may be end up screaming in frustration a few times but, more often than not, you'll have a big smile on your face.

%20-%20YouTube.png)

%20-%20YouTube.png)

%20-%20YouTube.png)
%20-%20YouTube.png)
%20-%20YouTube.png)
%20-%20YouTube.png)
%20-%20YouTube.png)
%20-%20YouTube.png)
%20-%20YouTube.png)
%20-%20YouTube.png)

%20-%20YouTube.png)
%20-%20YouTube.png)
%20-%20YouTube.png)
%20-%20YouTube.png)
%20-%20YouTube.png)
%20-%20YouTube.png)
%20-%20YouTube.png)
%20-%20YouTube.png)
%20-%20YouTube.png)
%20-%20YouTube.png)
.png)


%20-%20YouTube.png)

%20-%20YouTube.png)
%20-%20YouTube.png)


%20-%20YouTube.png)

%20-%20YouTube.png)

%20-%20YouTube.png)
%20-%20YouTube.png)

%20-%20YouTube.png)

%20-%20YouTube.png)


%20-%20YouTube.png)

%20-%20YouTube.png)

%20-%20YouTube.png)

%20-%20YouTube.png)

%20-%20YouTube.png)
%20-%20YouTube.png)


%20-%20YouTube.png)

%20-%20YouTube.png)
%20-%20YouTube.png)
%20-%20YouTube.png)
%20-%20YouTube.png)
%20-%20YouTube.png)


%20-%20YouTube.png)
%20-%20YouTube.png)


%20-%20YouTube.png)

%20-%20YouTube.png)
%20-%20YouTube.png)

%20-%20YouTube.png)
%20-%20YouTube.png)

%20-%20YouTube.png)
%20-%20YouTube.png)
%20-%20YouTube.png)
%20-%20YouTube.png)

%20-%20YouTube.png)
%20-%20YouTube.png)

%20-%20YouTube.png)
%20-%20YouTube.png)
%20-%20YouTube.png)


%20-%20YouTube.png)
%20-%20YouTube.png)

%20-%20YouTube.png)

%20-%20YouTube.png)
%20-%20YouTube.png)
%20-%20YouTube.png)

%20-%20YouTube.png)
%20-%20YouTube.png)
%20-%20YouTube.png)
%20-%20YouTube.png)
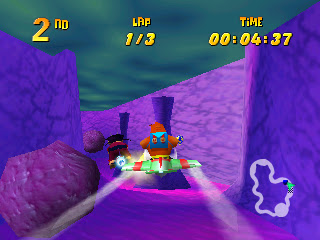
%20-%20YouTube.png)
%20-%20YouTube.png)
%20-%20YouTube.png)
