Sunday, January 24, 2016
The People vs. George Lucas (2011)
This summary is not available. Please
click here to view the post.
Wednesday, January 13, 2016
Stuff I Grew Up With/Video Game Corner: Star Wars: Rogue Squadron (1998)

The main story of the game takes place during the time between A New Hope and The Empire Strikes Back, with the Rebel Alliance continuing their struggle against the Empire following the destruction of the Death Star. You play as Luke Skywalker and lead Rogue Squadron on a series of various missions that fall into one of four categories: search and destroy, reconnaissance, protection, and rescue (the latter two make up a good chunk of the game). At first, the levels feel rather random and unrelated in terms of an overall story but as the game progresses, you become aware of Moff Seerdon, a ruthless Imperial commander who makes destroying the Alliance and its allies his top priority once you've destroyed a number of his installations and interfered with his operations. What the levels all have in common is that each of them limits you to using one type of aircraft but when you go back to replay them upon completion, you can now choose from a wider selection (for most of them, anyway). Your performance during each level is also measured via statistics such as how long it takes you to complete the mission, how many enemies and Imperial structures you destroy, how accurate your shooting is, how many of your comrades and friendly structures you save, and whether or not you collect hidden bonus items. If you hit certain benchmarks in these statistics, you're awarded with either a bronze, silver, or gold medal that helps promote your rank (the highest I ever got was Colonel but you can as far as Supreme Allied Commander) and can also unlock hidden levels and ships if you win enough of a certain type.


Other factors that make this game so difficult include the fact that you only have three lives. And this isn't one of those games that counts the number "zero" as a life, giving you four chances in reality. No, you die or fail a mission three times, it's game over and you have to start the mission from the beginning. This is where the absolute craziness of many of these levels, especially in the latter part of the game, will really get to you and make you think that it's unreasonable to think that you could succeed with only three lives. In fact, this is where I have to make a confession: I never beat this game fairly. One of the last levels is so insane in its difficulty that I had to resort to using a password that gives you "infinite" lives (you'll see why I put that word in quotations down below) in order to succeed. And what's more, the two levels that come after that are even worse, so when I attempted to play them fairly, I didn't last very long. You can call me a cheater if you want but it was the only way that I could experience the whole game. For that matter, getting all of one type of medal on every regular level is so difficult that I had to put in another password that unlocks all of the levels in order to play the bonus ones and, by extension, use others to unlock the Millennium Falcon and the TIE-Interceptor, which can otherwise only be accessed by earning medals on said bonus levels.
Going back to your lives, you can also lose one if you fail a mission rather than simply get killed. The difference is that if you die, the mission is still going and you respawn near where you died, whereas if you fail the mission, you have to do it again. When that first happens, you may initially think that your lives have been reset but nope: you only have either two or one more chance, otherwise you game over and you have to start from scratch anyway. And this is where the infinite lives code becomes not as true as you might think. That code keeps your number of lives at three no matter how many times you die but, if you actually fail a mission, the number will suddenly get bumped down to two. It'll still stay there no matter how many times you die but I think you get where I'm going: if you fail two more times, you still get game over, infinite lives or not. As you might expect, failing a mission usually happens when whatever you're trying to protect is destroyed and the developers did something downright shitty to make that task just a little harder. When you get shot out of the air, you have to wait for your ship to crash and even then, you're forced to wait a few seconds until the "death" music ends. There is no way, that I know of, to skip this and the mission is still going on during those precious seconds you're stuck in limbo, meaning your objective is still being attacked. Given how difficult the game already is and that you're under major pressure to protect the ship or structure anyway, this is an instance of the developers being nothing less than major assholes. And if you're like me in that you hate these types of levels, which make up a good chunk of the game, in general, it makes it even easier to very quickly lose your patience and explode, especially when you get into the really hard levels during the latter half. There's even a password you can put in to make the game harder, which is only for sickos who love a challenge (i.e. not me).
There are other instances where the game itself feels like it's actively trying to screw you over. When you respawn after you die, it can be hard to figure out where you are and reorient yourself since the game tends to drop you either right above or a small distance from where you were shot down. When you manage to topple over an AT-AT, the game will sometimes send you careening out of control when it cuts back to you for no reason. There was one time where I found myself screaming right at the ground and I crashed before I had a chance to get myself under control! I still don't know what went wrong there. The radar in the upper right corner of the screen often points you where you need to go but there are times here and there where it simply forces you to guess where your next mission objective is, sometimes showing you a cinematic of something important happening but not giving you any indication as to where it is, causing you to waste precious time while desperately looking around. And finally, your squad-mates are very little help in battle, often yelling for you to save them while they don't do anything to help you when you're taking a lot of hits or when you've got an enemy on your tail. In fact, when you fly in formation at the beginning of some levels, they can actually get in your way and smack into you! And the voiceovers that admonish you for accidentally shooting them or a civilian target can really work on your nerves since they act as if you did it on purpose.


The game's sound design is also noteworthy, although the music is a little odd. It's mainly made up of John Williams' recognizable cues from the original trilogy (the main Star Wars theme, the Imperial March, the themes for the Death Star battle and the battle of Hoth, and so forth), as well as some original music from Chris Hulsbeck, but it's all very synthesized and electronic rather than orchestral, as the music for Shadows of the Empire was, which can really take you aback when you first hear it. It's not bad, mind you, and some of the new music, like the intense, dire theme you hear during really critical missions such as the Raid of Sullust, is very catchy, but it's not the type of sound you usually associate with Star Wars at all. The sound effects, however, are the classic stuff you remember from the movies and they sound really nice (which is interesting since it appears that LucasFilm only allowed the developers to use them in an audio rate that was half the standard one), and the voiceovers are nice, clear, and abundant, rivaling Star Fox 64 in terms of sheer amount and, as Ryan MacDonald of GameSpot noted, making it feel more like a movie.
And now, on to the breakdown of the levels, which are grouped up into several chapters signifying the progression of the story. As we go into the details, you'll really see what I mean when I say that this game can be maddening in its difficulty.
Chapter I: The Rebel Opposition

Ambush at Mos Eisley: As hard as this game gets later on, this first mission is ridiculously easy. First, you have to save some homesteads from groups of Probe Droids, which is no problem at all since your radar will point you in the right direction and the droids can be taken down with only a few laser blasts. Really, the only "challenge" is that you have to search every corner of the various sections to find every droid since they can be easy to miss due to their small size as well as that, if you're going for a medal, you have to take out the droids shooting at the houses before they cost you some "friendly saves" points. Once all of the Probe Droids have been destroyed, you're shown a cinematic of TIE-Bombers attacking Mos Eisley but, again, this isn't that hard as long as you follow your radar and close the S-foils to go even faster. And like I said before, Bombers are the slowest of the TIEs, so it shouldn't be that difficult to blast them before they cause much damage to the town or shoot down your comrades. A deceptively easy start to a game that will become very unforgiving down the line.

Rendezvous on Barkhesh: Here's your first taste of the many "protection" missions you have to take part in throughout the game. Your mission is to protect a convoy carrying vital supplies for the Rebellion that has no choice but to travel through an area controlled by the Empire. You have to clear a path for them by destroying any obstacles in their way, mainly Probe Droids, AT-STs, and laser turrets, but you also have to close to them and protect them from the biggest threat: TIE-Bombers, which will attack at a couple of key locations and can very easily blow the convoy to smithereens if they're not downed. The best strategy is to fly ahead a little bit to destroy any threats that lie along the route and then do a quick flyby back to make sure the vehicles are safe, staying up high in order to spot them most effectively. This mission isn't too hard (even though I failed it the first time I played it), although trying to keep your eyes peeled for the Bombers while trying to keep the path clear for the convoy, as well as the twisting, turning nature of the route, can be a bit nerve-wracking. Although, I must again remind you that this is nothing compared to what the game has in store later.


The Search for the Nonnah: Even though this level is a part of the fairly easy early part of the game, there have been a few times where the odds have gotten the better of me and I've failed. The first part of the mission has you searching for a crashed Rebel ship while dealing with enemies like Prode Droids and TIE-Interceptors here and there. Every time you play the level, the ship will be located in one of three separate corners of the map and the thick fog can make it very easy to get turned around. If you don't find the Nonnah during this early part of the level, you'll get a message that the ship is under attack and your radar will point you in the right direction. Once you arrive at the party, you have to protect the ship, and the rescue shuttle that flies in to evacuate the passengers, from both air and ground-based waves of Imperial forces. An Imperial shuttle lands on the nearby riverbank and deploys an initial wave of AT-STs and laser tanks, followed by some TIE-Bombers swooping in to pound the ship and another wave of ground forces involving AT-PTs and tanks. The ground forces, especially the second wave, aren't that difficult to handle but the Bombers and Interceptors are what pose the greatest threat to the shuttle. The Bombers may be slow but you have to time your attacks perfectly when they swoop in from whichever direction they choose, otherwise the shuttle will take some hits. Also, once you've destroyed the initial pair of Bombers, you have to shoot down the Interceptors that swoop down and fire at the shuttle while not forgetting about the next wave of Bombers and ground forces. And you have to keep in mind that you're flying the weaker A-Wing in your first playthrough, so you have to be cautious when attacking. Finally, when the shuttle lifts off, you have to stay behind it a ways in order to shoot down some more Interceptors that'll come in for one last attempt to destroy it (I've ended up losing the ship during this last, crucial section more often than not by not being able to catch the TIEs in time). Once the shuttle zooms off into the sky, you can breathe easy.


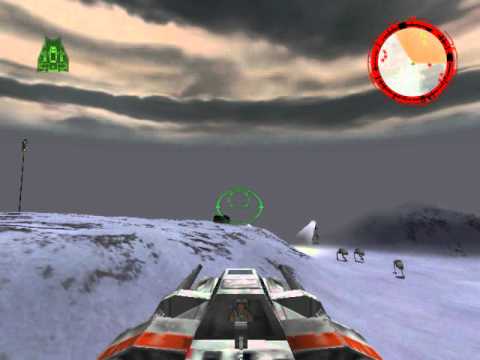
Defection at Corellia: The first snow-speeder level, which should give you an idea of what you're going to be eventually facing, this mission starts off quiet enough with you and your squadron patrolling the outskirts of the city of Corellia where General Riekaan plans to meet with Crix Madine, an Imperial officer who plans to defect to the Rebel Alliance. Only a few seconds in, however, Wedge says that he picking up some strange readings and your radar will point you in the right direction so you can investigate. You find a small valley filled with Probe Droids, which are easy enough to deal with, but once you've destroyed them, you see a cinematic of TIE-Bombers attacking the Corellian Capital Building while Riekaan calls for help. You're then forced to rush back to the city and fight off the Bombers, which can be tricky since these speeders weren't meant for aerial combat and aren't too good at keeping up with the Bombers as they circle around the city in groups for separate bombing runs on the capital, even though they are the slowest of the TIEs. Plus, you have to watch where you're shooting because your blasters can add to the damage of the buildings. Once you've gotten rid of the Bombers, Madine calls and tells you that he's stuck at the Tech Center across from the city, which is also being bombed. I actually got lost and couldn't find the Tech Center the first time I played this game since, one, the TV I had back then had a very poor brightness feature, and two, I was young and not smart enough yet to understand that the radar will tell you where you need to go. In any case, once you arrive at the center, destroying the four Bombers there isn't that difficult, but the minute you're finished with that task, Wedge will tell you that there are more Bombers heading for the city. Fortunately, Han and Chewie come roaring in with the Millennium Falcon to give you a hand, which allows you to concentrate on an even bigger threat: an AT-AT approaching the capital. This first taste of wrapping up the walkers with tow cables isn't that difficult and if you use the best tactics for doing this that I talked about earlier, you should bring it down in no time. Once that done, you can help the others with clearing out the Bombers when Madine calls you back to the Tech Center, which is now under attack from a couple of AT-STs and another AT-AT. The former are closer to the building, so it's best to take them out first and as quickly as possible before going after the AT-AT. One last task is to protect the shuttle that arrives to evacuate Madine from two trios of TIE-Fighters that come in for one last attack. Destroying them isn't that tricky and they're not very difficult to spot before they can land some hits on the shuttle. After they're gone, you can finally catch your breath as the shuttle will then fly off towards the horizon with Madine. (There are other battles going on around the city during this entire level but you must concentrate on your objectives and not worry about them unless you have extra time in-between.)


Liberation of Gerrard V: Here, you provide cover for your new comrade Crix Madine as he leads a group of Y-Wings in disabling Imperial freighters that are looting that are looting two sections of the city of Gerrard V. The first order of business is to destroy the laser and missile turrets in around the first city so the Y-Wings can do their job. The missile turrets along the ridge on the outside of the city are the biggest threat to both of you, so it's best to take them out first before going after the lasers, which are located on top of buildings and on the streets. There are other forces approaching from the outskirts like AT-PTs but they don't pose much of a threat. Once you destroy all of the turrets here, Wedge contacts you with a warning that an elite squadron of TIE-Interceptors is on its way. As he tries to hold them off, you and the others head to the second city through a canyon, destroying missile turrets along the way before repeating what you did at the first city. The biggest threat here is an enormous gun tower on the edge of the city that you must take out as quickly as possible, preferably with your proton torpedoes rather than wasting your time with laser blasts. Once that thing's gone, you once again have to destroy the laser turrets throughout the city and by that point, the Interceptor squadron will arrive. These guys are very fast and agile, so your job is to continue protecting the Y-Wings until they complete their mission rather than shooting down every single Interceptor. And one last big bit of advice: if you're equipped with seeker proton torpedoes, you have to be careful about the Imperial yachts the Y-Wings are trying to disable because your targeting system will lock onto them and if you destroy one, you fail the mission.
Chapter II: Rogue Squadron (lazy much?)


The Jade Moon: If you know what you're doing, this level is both short and surprisingly easy. Again, you're protecting a separate squadron being led by Crix Madine. this time as they attempt to use a fleet of tanks to raid an Imperial storage facility, the location of which was provided by another former Imperial, Kasan Moor. The first objective is to clear a path for Madine's troops towards the facility, destroying some AT-PTs that approach them and then taking out some laser turrets that are located around the base. As you immediately see, the facility is protected by an energy shield and you have to find and destroy the generator. Finding it isn't difficult but getting there can be tricky due to the missile and laser turrets strewn along the way (one of the level's very objectives suggests flying low to avoid taking damage) and the generator itself is guarded by more turrets and an AT-PT, so it's unlikely that you'll come out of this unscathed. Once the generator has been destroyed, a task that could require a couple of passes, Madine's troops will begin moving in but so will more AT-PTs and an army of TIE-Fighters and Bombers. The walkers and the Bombers especially are the biggest threats to the tanks, so you have to go after them first. As before, you have to be sure to shoot down the Bombers as quickly as possible since they can destroy the tanks with little effort. Once they're gone, you can battle the Fighters, which aren't that good at hitting the tanks anyway, until the mission ends. Again, not that hard of a level, although if you're going for a medal, you have to fly off the beaten track to find an obscure building holding a power-up as well as destroy every last enemy you come across.


Imperial Construction Yards: This is where the game begins to stop fooling around and become very difficult. Your mission is to attack an Imperial construction facility responsible for the production of TIEs and walkers but first, you must reach it without being detected. As you fly through the valley leading to the facility, you come across six sensors that you must destroy from a distance since they can very easily detect you. While the first couple aren't that difficult, the others are on the other sides of sharp turns and steep hills, forcing you to really watch your maneuvering in order to get them in your sights and destroy them in time. The fourth one is the worst because it's hidden behind an outcropping that creates a fork and if you take the path off to the right, you'll fly into the sensor's rage and fail the mission. Even when you take the left turn, the curve is still very tight and getting around it to destroy the sensor isn't easy. Once you enter the base, you've still got your work cut out for you because this place is full of enemies, with the biggest threat being groups of TIE-Fighters that come flying down the valley continually and can easily shoot down your unshielded snow-speeder, as well as missile turrets perched on ledges above some of the construction yards. There are a couple of AT-ATs to be found here as well but this is one instance where it's not required to bring them down because once you fly past them, they're no longer a threat and you can concentrate on destroying the construction yards. Basically, all you have to do is find the AT-AT and AT-ST factories and shoot everything you see, leveling the place. While that's not difficult, doing this takes many passes and you have to tangle with the Imperial forces defending each factory (including stormtroopers on the ground), so you have to use some strategy rather than just flying straight in and shooting like a maniac. The AT-AT factory in particular is well-guarded and you come face-to-face with an AT-AT and pairs of missile and laser turrets after coming around a sharp turn. Basically, you have to keep moving and shooting while keeping an eye on your surroundings. The good thing is that if you're going for a medal, this level gives you plenty of targets with which to meet the 80 enemies you need to down, including a landing pad with some parked TIE-Fighters that are easy pickings (hitting the pad adds to your accuracy tally as well).


Assault on Kile II: This is the level where I started to become very frustrated with the game when I was a kid. Your objective here is to destroy an Imperial spaceport hidden within some deep canyons, making this level very similar to the previous one. However, this one can get on your nerves much quicker for a number reasons. One, the twisting, turning canyons you have to navigate in order to find your three targets are very easy to get lost in and, no matter how times I play this level, I always end up turned around somewhere along the line. Two, this is the first level where you have to fly the strong but slow Y-Wing, using its bombs to destroy your targets. And that leads into reason number three: this level is filled with laser and missile turrets, both along the floor of the canyons as well as around and near the spaceport, radar station, and garrisons you must destroy (blowing those up around the former is part of your objective), and TIE-Interceptors. This is the first level where, at certain points, an Interceptor will zero in on you and harass you relentlessly until either you destroy it or it shoots you down and that caused a lot of screaming fits from me when I was eleven (which, in turn, led to my parents yelling at me to be quiet). Trying to get behind a TIE that's tailing you is hard enough with any ship but when you're flying the ungraceful Y-Wing, it's damn near impossible. It's possible that it'll stop chasing you if you get far enough away from it in the canyons but not sure a thing. And I don't think I need to tell you how vulnerable you are to the heat-seekers those missile turrets fire. Really, the only strategy is to keep your cool, get to and from your targets and destroy them as quickly and efficiently as you can, and not waste too much time futilely chasing those TIEs.

Rescue on Kessel: During the previous mission, Wedge gets shot down and captured by the Imperial forces. Now, he's being taken to a prison on the planet of Kessel where he's sure to be executed unless the train transporting him and other prisoners is stopped. This level is very short and the sole objective is simple: use ion cannons that your X-Wing has been outfitted with to disable the train before it reaches the prison. You have to be careful not to hit the train with laser blasters since you can potentially kill Wedge and fail the mission. While it seems simple enough, there are plenty of enemies like laser and missile turrets and AT-STs to give you trouble and the completely flat landscape gives you nowhere to take cover. Even the train itself has laser turrets and you must ionize every single section of it in order to put it out of commission. While parts of the train that have been disabled will have blue electrical energy crackling around them, in the heat and confusion of the action it can be hard to make out, especially if you're a great distance from the train. Your best is to concentrate on the train as much as possible and only take down attacking enemies when you absolutely have to (if you're going for the gold, though, you must destroy every single enemy in the entire level, which requires you to take some detours off the beaten path).


Prisons of Kessel: Wedge may be safe but your business on Kessel is far from over. Now, you have to provide protection for Crix Madine as he leads a mission to rescue the other prisoners being held captive there. While the previous level was short and to the point, this one is long and drawn out as you have to follow Madine's shuttle to four different prisons, protecting it from harm while he and his commandoes get the prisoners out. At the start of the mission when you come to the first prison, you have to take out the laser turrets surrounding the place before heading off to destroy a nearby shield generator that protects all of the prisons, itself heavily protected (you fly past one of the other prisons on the way to the generator, so it's a good idea to try to take out some of the turrets there to make your job easier). Once the generator has been destroyed, you have to quickly head back to the prison and protect Madine's shuttle from TIEs that attack relentlessly until he says that the rescue is complete and heads for the next prison. Each battle of the following prison battles gets harder and harder, with more threats to the shuttle, like approaching AT-STs, that you have to deal with along with the turrets and TIEs. The last prison is the most intense since there's an AT-ST waiting for the shuttle underneath the landing platform, which can make it easy to miss if you fly in without paying attention, in addition to another one on the outskirts as well as more turrets. This is also where the speed and agility of the TIEs can get to you since you're obviously so desperate to keep the shuttle safe at this point, especially if you can pinpoint their altitude, as tends to happen to me here. And even when the rescue is complete and the shuttle is preparing to take off, you still have to keep your eyes peeled for any sneaky TIEs that may try for one last attack.
Chapter III: The New Threat


Battle Above Taloraan: The Empire is attempting to harvest Tibanna gas, a resource that can enhance the potency of their weapons, and it's your mission to foil their operations. This level consists of you flying through a series of floating platforms that are dotted with canisters filled with the gas which you must destroy. The task, however, is not as simple as it sounds. The platforms contain both Imperial and civilian tanks, often shuffled amongst or right next to each other, and you have to watch where you're shooting because destroying too many civilian tanks will cause you to fail the mission. (There's one annoying moment where Kasan Moor admonishes you to check your firing, even if you didn't do anything!) You're also flying the nimble but fairly weak A-Wing and, while the multitudes of TIEs flying around actually don't pose that much of a threat, the laser turrets found on the later platforms can very easily shoot you down. They don't take many shots to destroy but these lasers seem to inflict more damage than those that came before and they're often placed behind civilian tanks, once again forcing you to watch your fire (you must destroy the turrets in order to move on). Like the prisons in the previous level, the difficulty with the floating platforms increases as you go on, with there being a couple of spots where you have to clear out two platforms floating side-by-side and the last being outfitted with missile turrets. Like I said, although there are many TIEs buzzing around here, they're not as big of a threat as you might think and they're mainly just there to distract from your mission, so it's best to ignore them and concentrate on the platforms. You also have to watch out for civilian spaceships that are flying around, especially those that suddenly fly in front of you in a panicked attempt to get out of the TIEs' way, because you can easily run into them or shoot them if you're not careful. There was one time where, after clearing off one of the platforms, I smashed into the bottom of one of those enormous ships called blockade runners and was killed instantly before I knew what happened. (Hilariously, it came right after Kasan Moor's dialogue, "Nice job, Skywalker. I'm beginning to see why they say you're the best.")

Escape from Fest: A unit of Rebel commandoes managed to infiltrate an Imperial base on the planet Fest and comandeer three AT-PTs; however, their cover's been blown and you have to escort them to a rescue shuttle. God, I hate this level! The reason it's so difficult is because your timing has to be as precise as you can get as you clear the way for the trio of very weak walkers. When you first find them, they're stuck in a canyon with an AT-AT that's blasting away at them (often, the one at the rear gets blown up as I arrive) and it's your job to take the walker down while your comrades try to blow up a gate that's keeping them trapped inside. You have to do this as quickly as you can and then zoom past the gate and take care of a couple of laser turrets and a second AT-AT that are waiting for the AT-PTs, who will head right towards them once the gate has been destroyed (you'll be notified when that happens). If you manage to take out that batch of enemies when your comrades blow up the gate, you'll be making good time, but you can't breathe easy yet because you then have to fly over a nearby ridge and tangle up another AT-AT before the AT-PTs reach it. Once that's taken care of, you then have to deal with a squadron of Imperial tanks that roll in from down the hills to fire on the AT-PTs and while the walkers can defend themselves from the front, they're completely helpless against any tanks that get behind them, so those should be the ones you focus on. And just when you thought it couldn't get any more intense, a squadron of eight TIE-Bombers show up to blow the AT-PTs to smithereens, forcing you to once again work fast. As you can see, this level is a nightmare and it seems like something goes wrong nearly every time I play it: I either difficulty tying up that first AT-AT in time, I get shot down while tying up the second one, I'm stuck tying up the third one when the tanks roll in, etc. It's insane and I'm lucky if I can get one AT-PT to the shuttle intact (I couldn't imagine trying to go for the gold here). And when they do reach the shuttle, you still have to go back, destroy the shield generator for a nearby research facility, and then blow up said facility, but after that horrible meat of the operation, this is a piece of cake, even with the missile turrets defending the facility (still, you'd best be careful not to lose your last life and have to do this hellish mission all over again).


Blockade on Chandrila: Enraged over what happened on Fest, Moff Seerdon retaliates by having his forces attack the city of Chandrila and it's Rogue Squadron's job to stop him. Your first job is to escort and protect a supply train that's on its way to the city from numerous TIEs, particularly Bombers that come in from the rear to commence bombing runs on the cars. This first section is a warzone, with you having to fend off enemies that seem to come from every possible direction, particularly from behind you, and you have to watch for those Bombers because they can easily destroy a car before you know what happened. As long as at least one car remains intact, you'll be able to move on to the next objective, which is protecting the city from the Bombers that are attacking it. However, you can't leave the train just yet because two more Bombers will appear to try to blow it up and you have to shoot them down quick. Once that's done, you can concentrate on fighting the Imperials, including six AT-STs that show up to fire on three evacuation shuttles, which are often dwindled down to two before I can do anything since the cinematic here wastes your time (it's best to use your proton torpedoes to take the AT-STs out as fast as possible). After the shuttles are safe, all you have to do is fend off the remaining Imperials until you get the ending cinematic, where Kasan Moor attempts to chase the retreating Moff Seerdon but Luke makes her stand down. A fairly nerve-wracking level in and of itself but, for me, not nearly as frustrating as the previous one.


Raid on Sullust: In response to the attack on Chandrila, Rogue Squadron strikes back at Moff Seerdon by attacking an Imperial base on the volcanic planet of Sullust, mainly to destroy an enormous capacitor there. This is the level that forced me to use the infinite lives code in order to finish the game because, as the Nintendo Power Player's Guide describes, it's "harder than pulling the arms off a Rancor." What makes it so difficult is that you're flying the Y-Wing into an area that's a complete meat-grinder. You have to destroy twelve transmitters on the ground with your bombs in order to knock out the shield protecting the capacitor and every single one of them is guarded by either laser or missile turrets (nearly half of them are guarded by both), AT-STs, or all at once. In short, it seems like everywhere you go, you're being targeted, often by those homing missiles, and taking hits, and the Y-Wing's lack of speed and agility makes it nigh impossible to evade what's being shot at you, especially since you have to fly towards your enemies to bomb the transmitters. Since you come equipped with twenty bombs, it is a good idea to use the spares on those missile turrets but as for the lasers and walkers, all you can do is dodge as best as you can while you take out the transmitters (hopefully, you can take out some or all of those guarding a given transmitter with it). No matter how skilled you are, you're more than likely going to lose at least one ship before you move on to your other objective, which is destroying the capacitor by shooting up the rotating panels in its center. The panels don't take many shots to blow up but you have to make many passes to get them all and as you whittle them down, you'll find yourself waiting for the remaining ones to come into view so you can shoot them. Actually flying into the center isn't wise since, even if you've cleared out a number of panels, one can still easily ram you from behind or you can crash into one up ahead, destroying your ship instantly. Plus, a squadron of TIEs joins the fray when you've destroyed the transmitters, so you have to watch out for them as well. Very challenging level and yet, ironically, when I replayed the game for this review, I ended up beating it without the infinite lives code for the first time. Granted, I crashed on my last life right before the transition to the closing cinematic but the game let it slide, so I'm counting it.


Moff Seerdon's Revenge: Turns out that Moff Seerdon lured Rogue Squadron to Sullust to keep them distracted while he attacks the Alliance's bacta supplies on the planet of Thyferra. Your mission objectives are simple and clear: destroy everything Imperial, including their bunkers, and confront and take down Seerdon. Even though you're flying the X-Wing, in many ways this mission is worse than the previous one because of all the TIE-Interceptors and Bombers zooming around in the sky along with turrets and AT-STs on the ground and how you're constantly being led from one area to another to protect bacta tanks and civilians that get caught up in the mayhem. If you haven't collected many power-ups in the previous levels, this one will end up being even harder than it already is, especially due to areas where Interceptors chase you relentlessly while you're trying to destroy Bombers attacking the bacta tanks or turrets and walkers shooting at civilians. And you have to be careful where you aim because you can easily hit the bacta tanks yourself when trying to shoot enemies and Imperial bunkers nearby. There's just so much chaos going on and clearing out the Imperials takes so damn long that I'm lucky to survive long enough to face Moff Seerdon, who shows up in his shuttle after you've taken care of them to settle the score with you. It also doesn't help that by this point, I'm usually down to my last life and my shields are weak, which sucks big time since Seerdon's shuttle is fast, can withstand a lot of shots, and is armed with deadly seeker torpedoes. The best strategy is to fly far away from him, turn around, lock onto him with your own seeker weapons, and hit him as quickly as you can. If you repeat this pattern successfully several times, his shuttle will slow down and you can get in some blaster shots as well, inching yourself ever closer to the moment when his shuttle gets blown to bits. I must admit, though, that I've never beaten him without the advantage of infinite lives, so don't take what I've said as the Bible on how to win.
Chapter IV: Dark Empire


Battle of Calamari: This, the last of the game's "official" levels, jumps ahead to six years after Return of the Jedi, where Luke has left Rogue Squadron to pursue his Jedi training, leaving Wedge in charge. The new emperor is using enormous machines called World Devastators to strip the planet of Mon Calamari clean and it's up to Rogue Squadron to stop them. It's a simple enough objective but this is one hard mission, mainly because before you can destroy a Devastator, you have to take out a shield generator locked atop its rear, which can only be blown up at close range. This is made very difficult by the number of missile and laser turrets strewn across their tops and that you're flying the completely unshielded V-Wing. Plus, you'd best stay away from the Devastators' rear tractor beams because they can suck you in and smash you to pieces before you realized you made a mistake. Once a Devastator's shield is down, you have to bring it down by destroying two of its four leg jets on one side (I once got crushed when I stupidly flew underneath the Devastator and shot the jets, so don't make that same mistake) and you have a limited amount of time to do this before each Devastator reaches and levels the city in its sights. And on top of that, each Devastator, in particular the latter two, is accompanied by a number of TIE/Ds that will also attack the cities so you have take them out as well, which is tricky due to how quick and armored they are. Basically, you have to use the V-Wing's speed and weapons, especially the rapid-fire mode for the blasters and the cluster missiles, to the max in order to succeed here and try your best to keep your cool when things get dicey, as they quickly do.
Bonus Levels

Beggar's Canyon: During Rogue Squadron's downtime, Luke challenges three of his squad members to the same race that he and his late buddy Biggs ran through all the time when they were younger. This level is as simple as it gets, with the only objective being to win the race; the trick, though, is determining which of the three paths to take and who to follow. Zev takes the fairly straightforward, easy route through the center of the canyon, Dack takes the tougher route to the left, and Wedge, being the sicko that he is, takes the very difficult, twisting route to the right. While it doesn't matter as long as you win the race, whichever route you take determines what medal you'll receive at the end and you can probably guess which one is awarded to which path. Another stipulation is that you must stay within the canyon walls; if you fly or even hover above them for more than a second, Zev will say, "Someone's cheating out there. We're gonna have to start this race over," and you'll be disqualified. You may find that simple enough but the way the paths twist around and rise sharply can easily cause you to end up above them (there is a spot on the hard route where you can jump over a canyon wall without being disqualified but you have to really zip over there because lingering for more than a split-second will get you canned). And as you can also probably guess, it's not very sporting to shoot down the other racers with the Skyhopper's laser blasters.

Death Star Trench Run: This is by far the toughest of the extra stages, mainly because it's an absolute gauntlet of three long corridors filled with laser turrets, big laser towers, and TIE-Fighters than can easily take you down if you get caught up in the fray with them. The first of the two mission objectives is rather misleading because it says to, "Chase the Imperials through the trench," when really, all you have to do is make it to the corridor leading to the exhaust vent, meaning you can close your S-foils and breeze past your enemies. If you're going for the gold, though, you have to maintain a consistent, swift speed while blasting as many enemies as you can, making it even tougher than it is. Once Han and Chewie come to the rescue, it means that your target is around the next corner so you have to get your proton torpedoes ready (and no, Darth Vader doesn't enter the battle here). Using the Force doesn't work in this scenario, so you have to be sure your targeting computer is locked onto the exhaust vent, being careful not to lock it onto any of the other targets around it, and if you're too close to the surface when you fire the torpedo, you could end up missing the vent. What's really disappointing is that even if you hit the mark, you don't get a cinematic of the Death Star blowing up. Hell, you don't even get a shot of the entire thing in this game! That's unforgiveable, if you ask me.


Battle of Hoth: For the real last level in a pretty difficult game, this is surprisingly easy. Like the previous level, the scenario doesn't play out here as it did in the movie (Shadows of the Empire did a better job in that respect). Your first objective is to take out some Probe Droids that are getting a little too close to the Rebel transports and once they're done, you have to rush to save Rogue Ten, who's crashed his speeder, from a trio of AT-STs. You can probably guess what comes next: a small Imperial army is heading for Echo Base's shield generator and you have to stop them. This is one definite instance where your radar can lead you astray because if you follow it exactly, it'll lead you back to the shield generator rather than the approaching threats, wasting a bit of your time. In any case, you have to contend with two lone AT-STs, a second pair of them being followed by two AT-ATs, and one more of each approaching from a narrow canyon closer to the generator. The latter is the best one to deal with first, although when you go in to tie up the AT-AT, you'd best wait for it to enter the spot where the canyon opens up to avoid slamming into the walls. It's also a good idea to let those pairs across from you enter the field before tangling with them since, when the two AT-ATs are right next to each other, you can hit one while trying to tie up the other. And with both groups, it's best to either take care of the AT-ATs first or destroy the AT-STs quickly and wait for the bigger walkers to pass by the pairs of legs they leave behind so they don't get in your way while your harpooning. This mission may sound more difficult than I'm letting on but I've never felt as pressured here as I always am with the Escape from Fest level, so I stand by my opinion that my opinion that this level is fairly easy.

All in all, Star Wars: Rogue Squadron is an enjoyable game but it can also be very frustrating. On the good side, the game is well-made, with good graphics for the time, well-designed environments, plenty of voiceover dialogue to give the feel that you're playing one of the movies, a nice selection of ships to choose from that each have their own distinctive pros and cons, controls that are easy to familiarize, and gameplay that doesn't take any effort to get into. However, as I've been describing, the game is often very unforgiving in its difficulty, sometimes due to the individual missions and other times due to generally obnoxious aspects of the game's design and programming. In conclusion, while I would recommend it, especially to any Star Wars fans who haven't played it, if you don't have much tolerance for really difficult video games, you might want to steer clear of it because you may end up throwing your Nintendo 64 out the window before it's over.
Subscribe to:
Posts (Atom)