
In regards to its story, while the first Rogue Squadron took place during the period between A New Hope and The Empire Strikes Back, Rogue Leader spans the length of the original trilogy and beyond. As you'd expect, you get to play key battles from the movies, specifically the attack on the Death Star at the end of A New Hope (which is the very first actual level), the Battle of Hoth from The Empire Strikes Back, and the battle to reach and destroy the core of the second Death Star from Return of the Jedi, but you also get to play missions that take place in the midst of the films' narratives and actually connect to them. For instance, the second level reveals a portion of the Rebels' flight from Yavin IV to Hoth, another has you assisting some Rebels who were captured during the Battle of Hoth and taken to an Imperial installation, and one of the last regular ones has you take on a mission in the airspace of Cloud City, which has been taken over by the Empire since Lando and company fled from it at the end of The Empire Strikes Back. I said "regular ones" because, as with the first game, there are some bonus levels that you can unlock either by getting enough gold medals or by putting in passcodes. In a couple of these hidden levels, you play scenarios from the films involving the Millennium Falcon (specifically, when Han and Luke fight off the TIE-Fighters chasing them after they escape the Death Star and when Han, Leia, Chewie, and C-3PO have to escape the Imperials pursuing them from Hoth by flying into the asteroid field), whereas in two others, you actually get to play as Darth Vader to stop the Rebels from destroying the Death Star and to destroy their base on Yavin IV. The final unlockable level is an endurance version of the Death Star attack, where you're the lone Rebel fighter taking on waves after waves after waves of Imperial fighters. Once you've unlocked them, they appear in random spots on the mission select screen rather than being after the ten regular missions: the Death Star Escape and Asteroid Field levels can be found above Death Star Attack and Battle of Hoth respectively, while the others can be found above Strike at the Core, the last regular level.


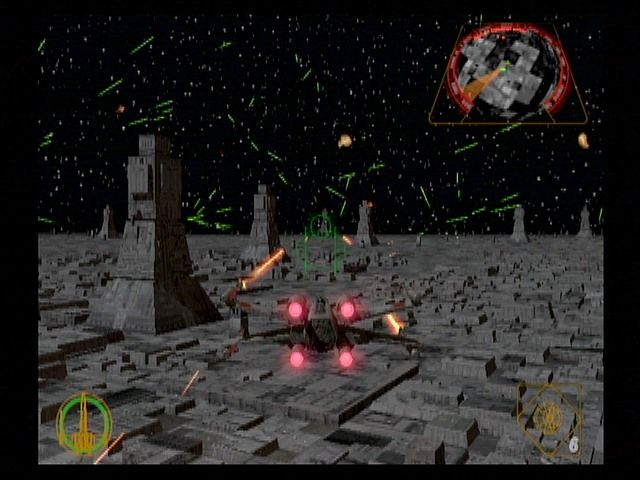
The gameplay and controls are, for the most part, identical to the first game. Each level tasks you with accomplishing a set amount of different goals, which range from destroying Imperials and protecting other Rebels to finding various crafts, locations. etc., and in each level, you're flying a different type of air- and spacecraft. Initially when you a play level, you're limited in regards to the different types of ships you can fly, only able to select one or maybe two, but when you've beaten the level and unlocked the other ships (by completing the levels in which they first appear), you can replay that level with the other available ships, which are shown on the holographic display on the mission select screen... most of the time. There are some levels, though, where you're always limited to one type of ship, with a big example being the Battle of Hoth, as you need the Snowspeeder's tow cables to bring down the AT-ATs, and there are also a number of levels where you switch craft once or twice during the mission. Like the first game, you only have three lives, which often feels like not nearly enough in order for you to do what you need to do, as we'll get into. During actual gameplay, you have several images displayed onscreen, including a health meter in the lower left corner (the image of your ship becomes progressively red the more damage you take), an ammunition count for the ship's secondary weapons in the lower right corner, the always useful radar in the upper right corner, and a "command cross" in the upper left that pops up from time to time when you're required to give instructions to other fighters in the squadron (I'll get to that in a minute). In addition to your mission objectives, you can also find tech upgrades hidden within each level that increase the potency of your ships' individual secondary weapons, their resistance to firepower, and even improves your targeting computer. Finally, what's really interesting is that there are a couple of stages in the game that are different depending literally on whether you play them during the day or at night; they react to your system's internal clock in order to randomize accordingly.


Control-wise, you have all the basics: A to fire your laser cannons, B to fire your secondary weapon, the shoulder buttons to either speed up or slow down, and so on. You can switch from third-person view to first-person, cockpit view with the X-button (usually, I just stay in third-person mode so I can see everything that's around me), barrel-roll while holding the little Z-button and moving the Control Stick in order to make tight turns, and move the game's camera with the yellow C-Stick. Speaking of the camera, whenever a TIE-Fighter of some kind is on your tail, the camera will pull back in third-person mode to allow you to see your pursuer but, while it is sometimes useful to be able to see how close he is so you can take action against him, I often find this irritating as the zoom-out makes it very hard to see what you should be doing. The Y-Button allows you to pull up your targeting computer, which is often very useful as it not only shows you which targets should be your priority (namely the ones that are highlighted in yellow) but also because it makes it easier to find your enemies, which is sometimes that not easy, since you're often battling TIE-Fighters and they are very easy to lose track of amidst the black background of space or gray-colored areas. The only downside to the targeting computer is that you have to hold down the button to keep it onscreen, which is can be difficult to do in addition to all of the other buttons on the controller you might have to push in the heat of combat. Going back to the "command cross" I mentioned earlier, now and then that image will pop up onscreen, corresponding to the D-Pad on the controller, and when it does, you can chose between either having your squad-mates form up alongside you, flee, or go after specific targets, along with other miscellaneous directions. When I first played the game, I didn't know what I was supposed to do, and I was confused when I kept hearing one of the other pilots say, "Awaiting your orders." I figured out what it meant purely by accident when I unintentionally pressed the D-Pad and at first, I thought it was cool and rather helpful. Well, it is for the first two or three missions but after that, it feels like your men don't do anything to help, even when you specify which targets to go after, and you basically have to do everything yourself. What's more, it can get irritating, as it comes up a lot more often than necessary and so, you have to keep pressing the D-Pad to give your men something to do while you're trying not to get blown out of the sky (you can also bring up the display manually by tapping the D-Pad). Much more helpful is how, when your ship is badly damaged, you'll have the option to order your astromech droid to make repairs by pressing any direction on the pad. But, when that option comes up, you'd better hit that D-Pad quick or your droid will blow out and you'll be stuck with a ship that's on the brink of getting shot down (and not all ships have a droid).


Like the original Rogue Squadron, 99% of the main, and most of the bonus, spaceships that are available to you in a given mission are to be found in the hangar, which you move your pilot through to pick your preferred one. This is a bit more tedious than in the first game, where you simply panned the camera from ship to ship, but on the other hand, walking up to them makes it easier for you to reach all of the ships, whereas before you had to sometimes move the Control Stick in a specific way to reach some ships. What's also cool is that, while it's mainly a hangar on a big mothership, there are some instances where the hangar changes to correspond to whatever part of the trilogy your current mission is set in, like the base on Yavin IV for the Death Star attack and the ice base for the Battle of Hoth (and when you unlock the bonus levels where you play as Darth Vader, you move him around an Imperial hangar!) The one main ship that you don't select from the Rebel hangar is the T-16 Skyhopper, which you use during the Tatooine training level that you have the option to play before the actual missions in order to practice the game's controls and flying mechanics. It comes equipped with the typical laser cannon that all of the ships have and, the more you play through the training level, it acquires other secondary weapons like proton bombs and an ion cannon for you to practice with. Its most notable feature, though, is its speed boost, which you activate by pressing the R-Button when a triangular meter next to the secondary weapon ammo counter becomes completely full. Said boost is very useful in the racing challenges that are part of the training but you have to wait a bit for the meter to fill back up to boost again (something it has in common with several of the combat ships), so you have to keep that in mind.


As usual, the X-Wing is definitely the best ship of the game and the one to go for whenever it's available for a mission, including if the mission has to be beaten without it in order for you to move to the next level (which is why I often choose it if it's available whenever I replay a mission). It's virtually the perfect fighter craft: maneuverable, well-shielded, and can be very quick when you close the S-Foils and hit the throttle in order to speed toward your target or outrun an enemy that's tailing you. Its secondary weapon are its powerful proton torpedoes (although, you only get six of them per life, so you have to use them sparingly) and it has a handy astromech droid. The A-Wing is the fastest ship in the game, able to speed off into the distance with seconds of your hitting the R-Button (like the T-16 Skyhopper, you need to recharge before you can do it again), and it's also very maneuverable, easily able to fit through tight spaces and make sharp turns, the former of which is helped by its small size. Unfortunately, even with the advanced shields upgrade you can find in the first level, the ship is very vulnerable to laser fire and can be taken out in just a few direct hits, especially when you're being tailed by a TIE-Fighter, and there's no astromech droid, so you have to use its speed and agility to make up for that. Its secondary weapons, concussion missiles, create shock-waves upon impact and fire in groups of four but they're among the weakest secondary weapons in the game. The Snowspeeder, despite not being that well-shielded and also lacking a droid, is a ship that I have better luck with, thanks to its great agility and speed, powerful laser cannons, and the way you can hug the ground with it without worrying about crashing. Its secondary weapon, of course, is the two cables that you use to bring down AT-ATs, but you have to be a certain distance from the walker's legs before you can fire it and you have to hold the B-Button down while you make the necessary passes to tie the legs up. Once you get the hang of it, though, it's not hard at all, and it's best to hold down both the R- and L-Buttons to stabilize yourself while tying the legs up.


In contrast to the previous two ships, the Y-Wing is slow and hardly graceful but it makes up for that with its very strong shield, which are further complimented by the presence of an R2 unit, and powerful weapons. The proton bombs that it drops from its underside can be quite devastating to their targets, especially when they're upgraded, and they gradually refill automatically, but the downside to them is that the angle the camera switches to whenever you use them takes some getting used to. Sometimes, I end up switching back to the normal view when I intended to drop a bomb with a tap of the B-Button. Its ion cannons are used to disable targets rather than destroy them but this weapon is actually quite a pain to use, as you have to hold the B-Button down to charge it up, which takes a couple of seconds, and its range sucks, forcing you to practically get up in your target's face in order for it to be effective, which is not at all practical in one mission in particular. By far my least favorite ship is the B-Wing. Its laser cannons may blast really well and it has both proton torpedoes and ion cannons as secondary weapons but it's not all that fast, even when you boost yourself, and it has a bizarre shape that switches between a vertical shape when in combat and parallel when speeding. The latter is really hard to get used to and you have to be sure you're in the best position when trying to maneuver the ship around obstacles, otherwise you may find yourself crashing. Worst of all, the shields aren't all that great and it doesn't have a droid, so I find myself getting blown into oblivion when I least expect it, meaning that I never use this ship except when I absolutely have to.


Among the secondary ships you come across in the game, the most iconic is the Millennium Falcon, which you unlock after you complete the final main level; you also pilot it in one of the bonus levels. It has very strong shields, laser cannons up front, on top, and on bottom, all of which fire when you press the A-Button (the bottom cannon aims itself, making it very useful to pick off enemies that are tailing you), and twelve concussion missiles which fire two at a time as a secondary weapon; but, as you'd expect, its cons are its sheer size, its lack of maneuverability (trying to turn this fat beast is a real chore), and its slow speed, even when you hit the boosters. If you want a real challenge, try the final level, where you fly into the cramped, twisting tunnels that lead to the second Death Star's core, with the Falcon, and good luck if you do! In the two bonus levels where you play as Darth Vader, you pilot his advanced TX-1 model TIE-Fighter, which is definitely the best Imperial ship available in the game, as it has shields that are infinitely stronger than those of an average TIE, laser cannons that fire very rapidly, cluster missiles (they work best when they're upgraded to homing mode), and great maneuverability. The only drawbacks are that it doesn't have a targeting computer so you can easily spot your targets and there are no R2-unit equivalents that repair when it takes a lot of damage. Other secondary ships you have the option to take control of them in the middle of regular missions, one of which is the regular TIE-Fighter, which is available to you in the Imperial Academy Heist level. As we'll get into, the only reason why you would take it there is to be able to slip in the base without getting caught up in a huge aerial firefight because, otherwise, you'll be piloting a little ship that may be quite fast and agile but is very vulnerable and can be downed with only a few shots (when you see so many of them getting blown up so easily in all the other levels, does that really make you want to pilot one yourself). One last Imperial ship that you pilot at least once in the game is a shuttle that you steal during the last leg of the aforementioned level. Since it was never intended for combat, is slow as a slug, and has very weak laser cannons, it's easily the worst ship in the entire game, with its only saving grace being a self-aiming tail cannon as a secondary weapon. Once you've completed the two Vader levels, you have the option of replaying them with either the shuttle or the regular TIE-Fighter, in case you want more of a challenge (which you'll definitely get). During the second part of the Raid on Bespin level, you have the option of switching from your regular ship to a Cloud Car which, despite not being meant for combat, with weak laser cannons and no secondary weapon, is quick, has really good brakes, and is quite nimble, which you need during that mission. Finally, there are crafts that you unlock either by winning enough medals or via passcodes, one of which is the Naboo Starfighter from The Phantom Menace. Like in the first Rogue Squadron, it's quite fast (it rivals the A-Wing), has fairly strong laser blasters and proton torpedoes, but on the downside, it's a little on the weak side and its speed can be a little overwhelming when you hit the throttle. The worst ship in the entire game is the Slave I, Boba Fett's ship, which is very slow and weak, can barely make a turn, and has lasers that are nearly impossible to aim. Its secondary weapons are cluster missiles, which can be useful if you've had them upgraded to homing status, allowing you to pick off TIE-Fighters from a distance, but other than that, there's no reason to use the Slave I or to break your neck trying to unlock it. And you can also unlock a ship that's a flying car, namely the one driven by one of the developers, as you could in the first game, but it's really more for laughs than anything else.
Most of the ships' secondary weapons and other features can be improved with special tech upgrades that you can find in each of the regular levels, with each of the secondary weapons going from normal to advanced whenever you snag the corresponding upgrade and sometimes upgrading further to "homing." Going by the order of the levels they appear in, they are advanced shields (which you really want to get ahold of so you can last a little longer than you normally would), advanced proton torpedoes, advanced blasters for strengthening the firepower of your laser cannons, advanced cluster missiles, advanced proton bombs, advanced homing proton torpedoes, advanced spread proton bombs, advanced concussion missiles, advanced homing concussion missiles, advanced homing cluster missiles (the downside to homing weapons is that they lock onto whatever's closest, which may not necessarily be what you need to target), and advanced targeting computer, which allows you to keep the computer's screen up with one tap and use it to send your comrades after individual targets. All of these upgrades are worth going for but the icons representing them in the levels are very small and often hard to see, are typically hidden off the beaten path and often in structures and ships that you must destroy, and even when you successfully grab one, you must complete the mission in order for it to take effect; otherwise, you'll have to go after it again during the next playthrough.


The enemies you must contend with in the game are the typical Imperial forces you expect to come across in any Star Wars game, with the most common enemy aircraft being either regular TIE-Fighters or faster and more agile TIE-Interceptors. They start out as fairly easily to take down in the early levels but become tougher and tougher as the game progresses, as you more often find yourself being chased by them and they become harder to get a fix on in order to bring them down, especially the Interceptors. The TIE-Bombers, on the other hand, are never a direct threat to you but rather attack whatever you're supposed to be defending in a given level, meaning you have to make taking them down your top priority, which is tougher than it may seem because they have tough shields and can maneuver rather well, despite their slow speed. Imperial shuttles appear in a few levels, although they're never a direct threat and are more often to simply fill up space, but if you decide to take one down, you will find yourself getting fired upon. There are a couple of levels where part of your mission involves actually bringing down Star Destroyers, making this the first game I played where that was even possible. How can you possibly bring down something akin to that, you may ask? First, you have to take out the shield generators in order to make the command deck vulnerable, putting yourself in the midst of the ship's laser-fire and the swarms of TIE-Fighters that always accompanies them and, therefore, almost guaranteeing that you'll lose a life or two before you manage to succeed. The generators are the two large spheres atop the Star Destroyer's bridge and there's a third on its underside, which is particularly well-defended by numerous laser cannons and turrets. All of the generators take a good number of hits to destroy, even if you use proton torpedoes and similar secondary weapons, and once they've been taken out, you then have to destroy the command deck, which is the curved window in the center of the front of the ship's bridge and is a very small target to hit. Even worse, your homing weapons won't lock onto it, so you have to rely on accuracy to destroy it, while bristling against all of the firepower being thrown at you as you fly towards it over the well-defended body. And you have to be careful not to crash into the bridge as well, meaning that you really have your work cut out for you when you go up against these monstrosities.


On the ground, your biggest foes are the various types of Imperial walkers, and if a Snowspeeder is one of the ships involved in a mission, you can bet that it means you'll be going up against AT-ATs. Back in Shadows of the Empire on the Nintendo 64, it was possible to eventually bring them down with laser fire but in all of the games since then that I've played, the developers have gone with the movie's logic that their armor is too tough for laser cannons and that they can only be brought down with the speeder's tow cables. The smaller and weaker but still fairly tough AT-STs also show up from time to time, and it's best to attack them from behind rather than fly straight at them and into their laser-fire. The weakest of the walkers, the AT-PTs, which were in the first Rogue Squadron, are here too, and you often find yourself taking them down your Y-Wing's proton bombs, which they're completely defenseless against. After the walkers, the biggest grounded threats are the laser turrets, which come in various sizes from fairly small blocks and mounted cannons to big towers that fire continuously at you. The smaller ones can usually be taken down with only a few direct shots, while the larger ones take a lot more and you often find yourself using proton bombs to do so more efficiently, but where they're really a threat is when there are dozens or even hundreds of them in a given stage. Probe droids and Imperial stormtroopers are usually not worth batting an eye at but sometimes, you have to defend Rebel forces on the ground from them; needless to say, it doesn't take much to obliterate them when you have to.


Graphics-wise, this is definitely one of the best-looking games developed for the GameCube and really shows off what that system was capable of. It took the look of the first Rogue Squadron, which was already quite advanced for the Nintendo 64, especially when it was enhanced by the Expansion Pak, and multiplied it ten-fold. Everything in the game, from the ships to the environments of outer space and the various planets, and even the character models, when you briefly see them, are incredibly detailed. There's virtually no difference between the quality of the cutscenes and the actual gameplay, which was quite amazing at the time since, usually, such a thing was very apparent, and there's even an instance early on at the end of the first level where they mixed the visual of the Death Star exploding from the movie itself in with the game graphics. At the time, details like that made it feel more than ever like you were playing the movies, showing that Star Wars games had come a long way since the groundbreaking Shadows of the Empire. It's not 100% perfect, as you still have to deal with invisible boundaries in the levels that turn you around when you reach a certain point (which, while helpful most of the time, becomes a real nuisance in the first Darth Vader bonus level) and the levels set in space can become very disorienting in the heat of the action as, even with your radar, it's very easy to get lost and lose sight of where the battle is taking place, but it's still a very advanced game for its time and got a lot of deserved praise for it. One aspect of it that was considered particularly high-tech, and which the Nintendo Power Player's Guide loved to point out, was how it features actual footage from the movies on the menu screens. You saw that kind of thing all the time on CD-ROM games but for those of us who grew up with console games and didn't have a computer during our childhoods, seeing this stuff play behind the START, OPTIONS, and other menus of a Nintendo game wasn't something we were used to. It was also a big deal because the original trilogy hadn't been released on DVD yet at that point (at the time, I didn't have a DVD Player) and the clips they showed were of that quality, which the Player's Guide also pointed out and gushed about how it set the mood, which I don't think I'd ever seen any type of strategy guide do. Like James Rolfe said in one of his Angry Video Game Nerd videos, never would we imagine that we would be able to watch even higher quality stuff, let alone whole movies, on the internet one day, or for that matter that console games based on movies would soon start showing clips, with sound and everything, in-between levels.
Speaking of sound, that's another element of the game that showed how different it was from the first Rogue Squadron. Even though Shadows of the Empire, one of the Nintendo 64's launch titles, had the actual music by John Williams at the quality it was in the films, Rogue Squadron had opted for a more synthesized, electronic sound both for the film music and its own original music. It still sounded really cool, at least to me, but it was noticeably different nonetheless. Rogue Leader not only employs the film scores in their original form but its use of Dolby Pro Logic II surround sound made them sound even crisper and clearer than they did on Shadows of the Empire. The pieces of music from the movies are employed very well in the game's various levels, corresponding to the recreations of the scenes they were originally scored for, as well as appropriate scenarios specific to the game itself, and the same goes for the game's original music, which you can tell is still on the electronic side but is, again, much clearer and of higher musical quality than in the first Rogue Squadron (the main theme on the title screen is just a higher-quality version of the original's theme). The voices for the characters are another element that sound much better than they did in the previous game, coming across more like they're actually there. They were able to get Dennis Lawson, who played Wedge Antilles in the movies, to record new dialogue for the game, and you can also hear the voices of notable voice actors like Rob Paulsen, Jeff Bennett, Grey DeLisle, Kevin Michael Richardson, and Tom Kane. The actors all do their jobs well (Scott Lawrence, who voices Darth Vader, and has done so in many video games, does an exceptionally good job of getting the quality of James Earl Jones), but when they start yelling at you to help them, adding on even more pressure, even when you're already trying your damnedest, or when they chastise you for hitting them when they stupidly fly right in front of your laser cannons, you might start wishing that the sound quality on this game wasn't so clear. Also, I miss the gruff-voiced guy from the first Rogue Squadron who told you the ins and outs of the various ships available to you in the hangar; instead, all of the narration in the game is done by the fairly bland, matter-of-fact voice of the mission selection narrator from the original. What's really weird, though, is the fact that his voice remains on the mission briefs for the Imperial levels, and it's odd to hear him say, "Good hunting, Lord Vader," before the first one begins.


The third challenge is to mow down a bunch of womp rats in a small valley, either by using the Skyhopper's blasters or with proton bombs you can acquire during one of the lessons. It's best to come at them from a high angle, make a slow descent as you fire, and drop a bomb before you veer up from the ground at the end of a run (you have to be careful not to damage your ship by hitting the ground too hard, though). At first, you're only required to blast twenty of them but it's best to take out as many as you can, since you'll later be required to rack up forty and then sixty; if you blow away that many the first time, you'll get that credit for the other challenges and not have to come back and do them later. Finally, a part of the training is to perform something of a scavenger hunt for various items called "Discovery Items," which are scattered throughout the desert landscape. These include Jabba the Hutt's palace (which is right in front of you at the start), a crashed TIE-Fighter in the middle of Mos Eisley (which is almost completely hidden from view), five Bantha herds, three Dewbacks, two Jawa sandcrawlers, and two special items, which are a Krayt Dragon skeleton and the escape pod that C-3PO and R2-D2 arrived on Tatooine in.You don't have to find them all in one go, nor is it that difficult to find them, as your radar points you in their directions, albeit in a random pattern, but whenever you come across one on the ground, you have to fly in really close towards it to get credit for finding it. And one final thing about the training: each playthrough lasts only twenty minutes and whenever five minutes pass, you're shown how much time you have left, so you don't have all the time in the world to get everything done.


Death Star Attack: For such an iconic and intense climactic battle, they sure took the edge off of it by making it the first level of the game (especially since it was an unlockable bonus level in the original Rogue Squadron and, as such, was pretty difficult). They had no choice, obviously, since this is the first time in the movies' canon where all the key members of the squadron come together, but except for first-time players who aren't used to the game yet, this mission is very easy. It introduces you to how all of the missions are divided up into several phases, with the first one here requiring you to destroy ten guard towers strewn across the Death Star's surface. Your radar points you in the best direction to destroy them all as quickly and professionally as possible, and while they do take a few laser blasts to bring down, some fairly accurate aiming is all it takes to make sure you destroy one within seconds of cruising towards it without having to come back around for another pass. Once you've destroyed all of the towers, a swam of TIE-Fighters will enter the battlefield and you have to take them all out before you can proceed (incidentally, when this second phase begins, if you keep flying straight in the direction you start out on, you'll find the game's first tech upgrade, which is the advanced shields). Like I said, at this early point, the Fighters are very slow and, despite their numbers and agility, are very simple to take out, as you can knock out an entire squadron by getting right behind them and pelting them with laser fire. While they can be easy to lose, that's what the targeting computer is for, and this is also where your wingmen prove to be useful, as they can really help you in bringing the Fighters down quickly.


Once you've downed all of them, it's time for the trench run towards the exhaust port, and this is the one part of the level that can be fairly tense and difficult. You have to stay within the trench (if you fly above it, you'll be cut to ribbons by all of the laser fire up there) and during most of the run, you have to bob and weave around steel beams that jut across the width of the trench, while avoiding laser fire from turrets placed along the bottom. When you hit a completely clear section of the trench, squadrons of three TIE-Fighters come in at you from behind and you have to quickly brake, let them fly over you, and bring them down; otherwise, they'll do the same to you. After that happens a few times and you have to weave around more beams, you reach the last leg of the level, where Darth Vader begins pursuing you in his advanced TX-1 Fighter. You have to use the same braking method to get him to pass you and, once he does, you can shoot him with all the laser fire you want but, of course, you won't kill him. After a couple of such instances, two TIE-Fighters will try to shoot you down, only to get blown away by Han Solo in the Millennium Falcon and once he gives you the all clear (all of his dialogue in the game is actual audio of Harrison Ford from the movies), you make the final run towards the exhaust port. You may want to speed up in order to get there more quickly and you have to be very precise where you shoot your proton torpedo at the small target but it's still not all that difficult considering (you may think replaying this with homing proton torpedoes would make it easier but because they target anything they can, you have to virtually get on top of the port to lock onto it).


Ison Corridor Ambush: Here, you must protect a convoy of Rebel transports led by the frigate, Redemption, through a section of space during their flight from Yavin IV to Hoth. In the cutscene leading into the mission itself, the Rebels find the floating remains of the last convoy and the cause of the attack becomes apparent when the level truly begins and you're swarmed by TIE-Fighters from all directions (the tech upgrade, advanced proton torpedoes, can be found at the very start inside a piece of debris with a big rectangular opening that goes right through it). The Fighters mostly focus on attacking the transports rather you or your wingmen, so you don't have to worry about taking any hits yourself, for the most part (some will get on your tail), and your main objective is to destroy as many of them as you can, as at least one transport and the Redemption must survive in order for you to complete the mission. This is trickier than before, as these Fighters are much more nimble and it's easy to lose them in the midst of the wide, expansive debris field due to their small size and the cloudy nebula surrounding the corridor (be prepared to bring up that targeting computer). You can also get lost yourself in the heat of battle, since you can't tell where up or down is in the vast expanse of space and you can also lose sight of the convoy, which you can use as a reference point. After you destroy the first wave of Fighters, more will come in and you will then receive the option to switch from an X-Wing to an A-Wing by touching the Rebel icon beneath the Redemption in order to better chase down your enemies. It's best to do so, despite the A-Wing's being weaker, as its speed combined with the targeting computer makes it easier to find the Fighters. This is also where the Fighters will start tailgating you more often, but again, the A-Wing's speed makes it fairly easy to outmaneuver them. The last phase of the level takes place in the murkiest part of the nebula, and this is where the quicker and more agile TIE-Interceptors join the party. If you haven't switched to an A-Wing by this point, you'd better do so now, and the targeting computer is more invaluable than ever to find your enemies in the thick haze surrounding you. If you keep it up and continuously order your wingmen to attack the TIEs, you should eventually bring them all down and complete the mission.


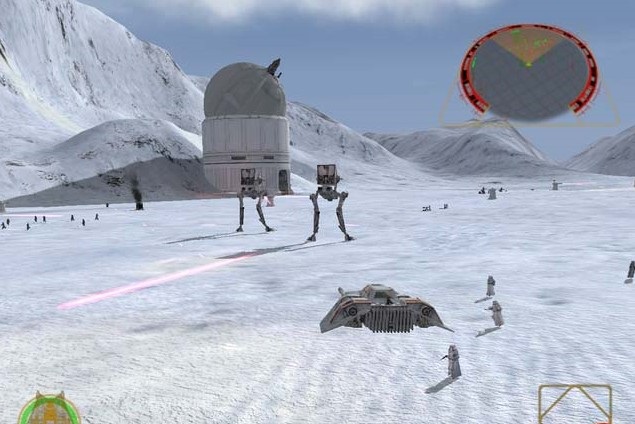


Battle of Hoth: Am I the only one who feels that this scene, as awesome and iconic as it is, is a bit overused as video game levels? It was featured as far back as the Atari 2600, was on both the NES and Super NES games, was the very first level on Shadows of the Empire, and was an unlockable level on the first Rogue Squadron, not to mention its being featured in the Star Wars arcade games. I love the battle itself but when you put it into so many games, eventually you're going to run out of ways to keep it fresh. In any case, when the mission starts up, your first order of business is to get to the battlefield at Outpost Beta (your radar points you in that direction) as quickly as possible, ignoring the probe droids floating in the canyon leading to it except if you want to rack up some accuracy points. Once you arrive, your targets are the AT-STs approaching the giant ion cannon that's disabling the Star Destroyers in orbit above the planet, specifically two waves across from each other that are almost on top of the cannon and another wave coming in far south of this spot. Again, the best way to take them out is to fly behind them and shoot their heads from behind, rather than coming at them from the front and getting cut to ribbons by their lasers. The ground forces will offer to pitch in but it's best to command them to retreat and let you and your men handle the battle, because all they'll do is get themselves killed if they join in. Once you've taken down the AT-STs, it's time to contend with the AT-ATs approaching the shield generator, specifically the three closest to it. After a long cutscene that recreates Luke's gunner getting taken out and Wedge having to take down the AT-AT he was going after (they always have to throw in Wedge's line of, "One more pass," as he's tying the legs up), you switch over to Wedge in order to tie up the three AT-ATs I mentioned. Once you get the hang of it and know how to best maneuver around the Walkers, it's not that difficult, although you have to be careful not to slam into an AT-AT's leg, as I've done before. Once you bring down the three, you'll see the generator get destroyed, leading into the last phase of the mission, where you head over to Echo Base to defend the transports as they take off (if you turn around and head back to where the shield generator was, you'll find the tech upgrade of advanced blasters). Once there, you can switch from your Snowspeeder to an X-Wing in order to deal with a squadron of TIE-Bombers, flanked by Fighters, that come in to destroy the transports. It's best to have your wingmen deal with the Fighters while you take on the Bombers, destroying them as quickly as possible, and even though they are well-armored, if you use your targeting computer and aiming skills wisely, you can take them all down before they destroy a single transport.


Prisons of the Maw: The goal here is to locate an Imperial installation hidden in this section of space and free a group of Rebels who were captured back on Hoth. This is also the first mission where you fly the slow but sturdy Y-Wings into the battlefield, as you need their proton bombs help the prisoners. First, though, you have to navigate your way through an asteroid field, make it past Imperial transports, and reach a large force field that you need to take down with the Y-Wing's ion cannons. Even if you order your wingmen to contend with some TIE-Fighters that show up to take you on, you'll probably still end up with one on your tail and it's virtually impossible to shake them with this slow beast of a ship you're piloting, so it's best just to ignore them and focus on the task at hand. To take out the force field, you need to hit three of the projectors emitting it with the ion cannon and because of the weapon's limited range, you have to get very close for it to work. There are some drone guns floating in the space in front of the field that will focus on you when you pass them, so it's a good idea to have your wingmen take them out. Once that's done, you reach the installation and receive a transmission from some escaped Rebel prisoners who need your help in order to get off the planet safely. First, you have to destroy a bunch of guard towers around the prison building they've escaped from and then, another set of towers surrounding a weapons facility that they need to break into in order to succeed in their task. Once you've secured the facility, a bunch of TIE patrols will zero in on you but you have to ignore them and fly over to the communication relays and destroy all of the dishes with your proton bombs, like you did the guard towers (when following the direction your radar points you in to reach the communication relays, you come across a dome-shaped building on the ground; bombing it reveals the tech upgrade of advanced cluster bombs). It can take a couple of bombs per dish to bring them down and you'll be bristling against the onslaught of Fighters on your tail will doing so, so you have to keep your wits about you. After the relays are history, you have to destroy one last set of guard towers at a landing pad where the Rebels steal an Imperial loader craft that they plan to use to escape. At this point, you should be an expert at it, and once they're down and the Rebels commandeer the loader, you and your wingmen have to protect it from a squadron of TIE-Interceptors that attempt to shoot it down. Needless to say, those speedy ships will fly circles around your Y-Wing but instead of destroying them all, you simply have to hold them back long enough for the Rebels to get clear, which isn't too hard. Finally, during this whole second phase of the mission, you're in a race against time to get things done before a patrol of Star Destroyers returns and cuts off your escape, so you can't dawdle.


Razor Rendezvous: This is the game where stops fooling around and cranks up the difficulty; it's also the level that gave me a reason to hate the B-Wing, as it's your default craft when you first play it and it makes your task even more difficult than it already is. You have to save a Rebel blockade runner dubbed the Razor as it's being captured by a Star Destroyer by taking the enormous craft down but, before you can even begin to focus on that goal, you must defend the frigate Redemption from waves of TIE-Fighters that are launched at it. Only a few of the Fighters will target the frigate, while the others will hone in on you and this is where your wingmen begin to become useless, as they don't do much to help you contend with all the ships that are trying to blow you to smithereens. (This attack on the frigate makes it difficult to get the level's tech upgrade, advanced proton bombs, which are inside an Imperial shuttle that approaches the Star Destroyer from its left. You have to destroy the shuttle before it docks and even then, it's difficult to find the tiny upgrade floating in the expanse of space.) Also, when you're trying to focus on the Fighters that are attacking the Redemption, and later on when you're trying to bring down the Star Destroyer, the camera's constantly pulling back whenever one gets on your tail will really screw up your accuracy and make it hard to see what you're doing. Once you're told that the Redemption is alright, you have to make your way over to the Destroyer and destroy its three shield generators. Like I said earlier, you'd best come at the two generators on top of the bridge from behind to avoid the firepower on the front of the ship, but even then, you still have Fighters dogging you at every turn and the generators take a lot of hits, so you might want to use a combination of the B-Wing's ion cannon and proton torpedoes to make things a tad bit easier. If you don't lose a life here, you're bound to do so when you head underneath the Destroyer to blast the third generator, which is guarded by a bunch of laser cannons. During this time, you may get another distress call from the Redemption but the faster you take down the Destroyer, the quicker you'll put the frigate out of danger. Once all of the generators are down, it's time to hit the command deck, and you'd better have plenty of strength left in your shields, because that target is small, it takes a few hits, and every turret on the ship will be focusing on you. And you also have to make sure you don't get so focused on destroying the deck that you forget to move out of the way of the bridge when you get real close (I've done that).


Vengeance on Kothlis: It's funny, I enjoy this level now because of how intricate and diverse the various phases of the mission are but, when I first attempted, I found myself getting very frustrated. The Star Destroyer from the previous level has crashed onto the planet of Kothlis and General Crix Madine intends to lead a commando team to retrieve valuable data from the downed ship; your ship is to protect and clear the way for his team. You begin the mission in an X-Wing and you have to defend the transport from swarms of TIE-Fighters and Interceptors as it approaches the crashed Star Destroyer. It's best to command your wingmen to take on the Fighters and Interceptors that focus on the squadron while you deal with those that are specifically targeting the transport (be prepared to get tailgated throughout this part of the mission). Once the transport sets down on the beach near the Destroyer and you've taken care of all the Fighters, there's a brief pause in the action that you can use to take out the laser turrets on the downed ship and to get the tech upgrade of advanced homing proton torpedoes that's floating in a hole close to the Destroyer's deck (you have to be very careful when you fly through it, though). A cutscene will then show that three AT-ATs have broken out of the Destroyer's hull and are marching through the shallows towards the transport. With that, it's time to fly over behind the transport and touch the Rebel icon to switch to a Snowspeeder and bring the Walkers down with the tow cables. However, doing this here is not as easy as it was during the Battle of Hoth because the AT-ATs are up to their knees in water, forcing you to watch your altitude as you tie their legs up. In addition, it seems like the cable has a tougher time attaching here, as I find myself having to press and hold the button several times to get it to work. There are also Fighters and laser turrets on the Destroyer firing at you but I've never found it to be that much of an issue myself. Once you've downed the AT-ATs, Madine and his commandos will begin the march to the Destroyer, which means it'll be time for you to switch crafts again behind the transport, this time to a Y-Wing. Once you've done so, you have to clear the way for the commandos by using proton bombs to take out the stormtroopers using mounted laser cannons against them and, more importantly, protect them and the transport from wave after wave of AT-PTs that emerge from the water. You have to make many runs over the battlefield to clear all the Walkers out with the bombs (you can bomb them effectively while they're underwater), including when Madine tells you to blast open a hole on the Destroyer's deck for the commandos to enter. The best way to go about it is to make a run over the deck, hit the big, weakened area indicated by the targeting computer with bombs, and then come back around and wipe out any more AT-PTs that are threatening the troops. Once you've made a big enough hole for the commandos (don't assume just because you manage to crack it that you're done) and you've destroyed all the Walkers, they'll enter the ship and do what they need to do. You can spend that time taking out any more TIEs that are in the air. Finally, throughout the battle, the Star Destroyer's reactor core will begin to become more and more unstable, threatening to blow up soon, so if you take too long in getting the commandos into it, it'll explode and you'll fail.


Imperial Academy Heist: The objective here is simple: make your way to a hidden Imperial Academy base in the valleys on the planet of Prefsbelt IV and steal a shuttle (namely the shuttle that Han Solo and company use to get past the blockade to reach Endor in Return of the Jedi). Doing so, however, is anything but simple, as you have to reach the academy without being picked up the sensors that line the valleys and canyons leading to it, which is made even more complicated in that this is the other level that is randomized depending on what time of day you play it. During the day version, you fly a Y-Wing and use the ion cannon to weaken the sensors while, at the same time, keeping low and staying far enough from them to avoid being detected. This is extremely difficult due to the cannon's lousy range, the rocks and ridges that can block your shots, and the narrow, twisting nature of the canyons that make it very difficult to turn around for another shot without being detected. It's even worse at night, as you're flying a Snowspeeder and you simply have to use its ability to hug the ground in order to stay low and get around the sensors, but you have to do so in the dark and through very thick fog. You have to rely almost entirely on your radar to find your way around because of the mist but even, you're liable to get too close to one of the sensors as you concentrate on staying low because they don't appear on the radar, and the ridges and boulders often cause you to bounce up into the air and risk getting detected. I tend to fail the first part of this level a lot more at night. Once you've gotten past the sensors, you have to choose one of two paths to take to the academy: the path that leads you through a blockade of Imperial forces guarding the way or a back-road that allows you to bypass everything. Either way leads you to a spot where you can commandeer a TIE-Fighter and sneak into the academy without having to fight off a bunch of Imperials but it's different depending on the time. At night, the Fighter can be found at a tiny outpost on the back-road and you simply have to kill the pilot as he walks around in order to get the option to take the Fighter; during the day, it's trickier, as you have to fly over the mountains on the path to the right to reach a valley with another Fighter is being kept, blast it with your ion cannons until it takes to the air, and blast it once more to force it to land so you can commandeer it. If you're spotted by one of the Imperials, though, doing so will be pointless. Speaking of that right path, if you decide to take, you'll come up against TIE-Fighters, AT-STs, and AT-ATs, which can add to your score if you're going for the gold but if you're not, it's best to just ignore them and head to the academy where the shuttle is kept. The academy is also where you can find a different tech upgrade in a different hangar for each time of day: advanced concussion missiles during the day and advanced spread proton bombs at night. You have to destroy the four groups of laser turrets guarding the shuttle before you can take it and once you do, you'd better follow the radar and go as fast as you can, as the whole base will be after you. Fortunately, you don't have to go far and you can use the shuttle's tail-gun to take care of the TIE-Fighters that get on your rear.
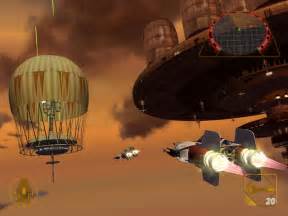


Raid on Bespin: The A-Wing's weak shields become oh, so apparent in this intense level, where you have to secure a number of Tibanna Gas tanks around the Imperial-controlled Cloud City. The first phase of the mission is where I often lose at least one life, as you have to go through a total of five platforms containing the gas tanks and stop the Imperials from destroying them in a last-ditch attempt to keep you from having them. The most immediate threat to the tanks are these laser cannon-armed dirigibles floating in the air around the platforms but they're not so hard to take out, as you just have to shoot the gas burners keeping them afloat to blow them up. You have to approach them from the correct angle in order to get a clear shot and you may have to get really close but once the dirigible explodes, the pieces of it become harmless. (The tech upgrade, advanced homing missiles, is located under one of the tanks on the second platform and is tricky to get, as you either have to destroy an Imperial Tanker next to it to reveal the upgrade or fly under the barely-suspended tanks yourself with the A-Wing.) The real threat to you, though, are the numerous TIE-Interceptors in the skies around the platforms. They're on your ass basically as soon as you begin the mission and they can cut you down within seconds (if you didn't get the advanced shields on the first level, you're doomed). They seem to be faster than ever here, too, and as useful as the targeting computer is in spotting them, particularly in the obscuring clouds of orange haze between the platforms, they're so nimble that you can get shot down while trying to find them. They do sometimes fire on the gas tanks themselves, although it's mainly to try to distract you away from the platforms; once you've destroyed all of the dirigibles threatening them, you can spend the rest of the time taking down the Interceptors until you move on to the next phase. Once all that's done, you move on to Cloud City, where you're tasked with knocking out three power generators in order to further hinder the Imperials' attack on the gas tanks. All three of the generators are hidden in the twisting, turning trenches beneath the city and even with the targeting computer pinpointing where they are within the city, you have to find the best way to approach them yourself. It's here where you get the option to switch over to a Cloud Car, which is much better at navigating the narrow trenches, although you'll want to switch back to the A-Wing for the final part of the mission. With the power off, the Imperials send some TIE-Bombers after the last batch of platforms near the city and you have to quickly bring them down. This isn't too hard, especially with your targeting computer, but once again, you have Interceptors dogging you while you're trying to do this. Fortunately, the minute you take down the last Bomber, this hellish level will end (but hell hasn't even begun yet).


Battle of Endor: If you've seen Return of the Jedi, you know how this scenario plays out. You're part of an all-out attack on the second Death Star, only to realize that the shield is still up and you're then immediately ambushed by hundreds of Imperial fighters of all types (it's a trap!) Needless to say, this level is a complete nightmare, and it starts right at the beginning. Since you know that Lando Calrissian is going to break off the approach towards the Death Star, when the level starts, you can turn around to face the Imperial fleet behind your ships and prepare for the onslaught of TIE-Fighters and Interceptors that come flying in. You won't get much time to take them out before you have to defend the medical frigate from being attacked (someone brought up an interesting point: in the movie, the medical frigate gets destroyed, so why is it so imperative for you to defend at all costs here?) Trying to fight off the TIEs attacking the frigate is very intense because of their swiftness and their sheer numbers, as well as the fact that you basically have to do everything yourself, as your wingmen are useless, and you often have TIEs tailing you while you're trying to do this. The constant pleading from the people aboard the frigate to help and Lando's warnings that it can't take much more doesn't help, either. Once you've taken down enough TIEs, you'll get a warning that a squadron of Bombers is approaching. Your targeting computer makes them easy to stop as they approach from the Imperial fleet and you can take out some right here with nice aiming skills, but they prove to be very deadly to the frigate because they can launch their bombs like missiles and, as you destroy more of them, you'll really need to rely on the targeting computer to pinpoint the last couple remaining. (Since there are ships everywhere during this huge skirmish, you also have to be careful not to slam into any whenever you turn your X-Wing around for another pass.) After you've destroyed all the Bombers, it's then revealed that the Death Star is operational when a cutscene shows it blowing up one of the big battle cruisers and the next part of the mission is to try to by the Rebels down on Endor more time by taking out two of the Star Destroyers. Yeah, remember how difficult it was to bring down one back at Razor Rendezvous? Now, you have to go through that twice in a role, which might make you ask the legitimate question, "Are you mad?!" (The tech upgrade, advanced homing cluster missiles, is off to the left and beneath the Destroyers but is really hard to find and you can waste a lot of precious time searching for it.) The method is still the same as before: destroy the three shield generators and then take out the command deck, and the best way to increase your chances of succeeding are to use laser fire on the first Star Destroyer and save your proton torpedoes for the second, as once the first is down, it'll go after Admiral Ackbar's command ship. It's very intense and difficult, and even if you manage to make it to this section with all three lives, it's still hard with all the TIEs buzzing around and the Destroyers' laser turrets firing at you, so don't be surprised if you lose at least one while doing this. And after you take down both, you still have some time before the level ends, so you can just take down some more TIEs.


Strike at the Core: The Death Star's shields are down and it's up to you and Lando in the Millennium Falcon to fly inside it and destroy its power core. This level may be shorter and there aren't as many phases to it but it's definitely no less difficult. First, you have to protect the Falcon as Lando flies across the Death Star's surface towards the entrance to the tunnel leading to the core, keeping up enough to fight off any TIE-Fighters and Interceptors that tail and fire at it, while also making sure not to get blasted to bits by the laser turrets below you. It is tough trying to find that balance of keeping up with the Falcon and yet, staying far enough away to blast the TIEs, while also trying to protect your own skin, but this first phase is just a warm-up for the really tough part of the mission. Once you both enter the tunnel, you have to continue protecting the Falcon while also navigating the claustrophobic, twisting passageways that are full of beams and pipes that you have to avoid crashing into. It's maddening, because you want to keep up with the Falcon, especially if there are TIEs on its tail (fortunately, they don't target you), but boosting in this tunnel can very easily lead you crashing into something, forcing you to start over from the entrance, and if the Falcon is destroyed, you have to start from the beginning of the mission! Just to be even bigger dicks, the developers put the last tech upgrade, the advanced targeting computer, underneath some pipes right before you reach the power core, which is a very tight space that forces you to slow down. In short, if you're going to go for it, you'd best take out any remaining TIEs that are tailing the Falcon. Once you reach the core, you have to destroy the curved regulator beneath the enormous reactor (it can be taken down with a single proton torpedo), and once you've done so, you and the Falcon have to head back to the surface the way you came. There are no TIEs, thankfully, but you have to outrun a wall of flames, boosting now and then when the flames start enveloping the screen around your ship, while once again flying through this cramped tunnel full of obstructions and making sure not to slam into the Falcon. Once you make it out, though, you can breathe a big sigh of relief and watch the galaxy-wide celebration of the Empire's fall from the movie before the credits. And like I said before, if you really want a challenge, try playing this level in the Falcon once you've unlocked it!
 |
| This is a shot of the level on the Dolphin emulator. |


Triumph of the Empire: Here's where you get to take control of Darth Vader in his advanced, TX-1 TIE-Fighter in order to fight against the Rebels. In this first stage, you must stop the Rebels from destroying the Death Star, and it plays out identically to the first actual stage where you played as the Rebels. You begin on the battlefield above the Death Star's surface, as you and your wingmen attempt to bring down squadrons of X-Wings and Y-Wings, and you immediately realize how difficult it is to take the very quick, nimble, and well-shielded Rebel ships. The X-Wings are especially hard to get a bead on, with even the Y-Wings seeming to be more nimble than normal, it takes a good number of hits with your laser cannons to bring them down, and they can cause you to waste enough time for the station to be destroyed. This is compounded by your ship's having a very limited range here. There will be so many times where you're chasing down some Rebels and are about to destroy them, when you hit the boundary and are forcibly turned back around. Also, Imperial wingmen are no better than the Rebels, as they don't do much to help and constantly bug you about what your orders are (what's funny, though, is if you accidentally hit them with your laser fire, instead of chastising you, they'll plead Vader for forgiveness or beg him to stop shooting). If you have the homing cluster missiles, however, taking the Rebel fighters down is a lot easier. Once you've cleared the surface, it's time to stop the squadrons that are attempting to fly down the trench towards the exhaust port. The first squadron is a trio of Y-Wings, which you can easily chase down the trench and blow away with your lasers (it's best to fly above the trench until you see them down below and swoop into it in order to avoid all of the obstacles in your way). Once you've taken care of them, you must turn around and meet the last two squadrons, which are both trios of X-Wings, that come down the trench. Again, I fly above the trench, wait until I see them pass by underneath, then turn around and fly down into the trench after them. There are plenty of Rebel fighters flying around above the trench but they're just a distraction, so you'd best ignore them and keep on the task at hand. If you do that, keep up with the Rebels, and watch the obstacles in your path, you can easily take them down and make it a glorious day for the Empire, as Vader says once the mission is complete.


Revenge on Yavin: The Emperor orders Darth Vader to lead an all-out attack on the Rebels' Yavin IV base, stopping from relocating to another base elsewhere in the galaxy. Your goal here is simple: destroy as many Rebel spacecrafts as you can. Your main targets are the transports, which are big, slow, and easy pickings (you can't allow more than two to escape), but you also must try to take down any Rebel fighters that cross your path. Without your cluster homing missiles, this isn't as easy as it may sound, given how agile they are, especially the X-Wings, and they also tend to gang up on and attack you, forcing you to play defensively while trying to destroy them at the same time. You have to constantly give attack orders to your men as well, so this is quite a busy and tricky level, and there are two phases to it, as usual. The second begins after you destroy the two sets of transports located in the battlefield in front of the temple, as more fighters are deployed and the Rebels attempt to send out more transports from their base within the temple. This is where you're likely to get overwhelmed, as you have so many fighters attacking you at once, and your wingmen don't do much to help you. There's really no strategy here, except to keep trying to take the Rebels down and destroy their transports when you can. Your mission is completed once all the transports have been destroyed, followed by a cutscene of the base itself being wiped out.
 |
| I wish I could lie and say I really made it that far, but nope. |

Endurance: You're the loan X-Wing (or whichever ship you decide to go with) taking on all of the Imperials defending the second Death Star and your only goal is to survive a seemingly endless wave of TIE-Fighters and Interceptors. That's all there is to this challenge, which definitely lives up to its name. If you decide to take this on, you'd best be ready to play for a long time, as you can destroy up to 99 waves of the Fighters in order to reach the goal medal (at least, I assume that's where it ends as, obviously, I didn't make it that far), and that can take up to six hours! The Nintendo Player's Guide jokes that it'll probably only take you half that time and adds, "If one of your friends wants to watch her Dances with Wolves DVD, or you don't like scary movies, you may be able to earn a gold medal before the final credits roll." There's really very little strategy here, except to use all of the skills you've accumulated at this point against the waves of TIEs, which will become more numerous and tougher with each one (according to the Player's Guide, they reach their maximum challenge at 60). With every ten waves, you'll get a breather where you'll be able shoot down a group of slow, defenseless Imperial shuttles in order to receive an extra life and you will have the option to repair your damaged ship if you reach that point (like always, you'd better hit that Control Pad as soon as you see that option or you're going to lose a life), which is nice to keep you in there for as long as you can take it, as are your secondary weapons. Personally, I don't really have the energy or the drive to try to go the distance with this, as I started to get burned out around the 14th wave and really, what's the point? Who's going to see your high score and be impressed with it? The only way I can see myself attempting this is one day I'm just really bored and have nothing else to do. If you're one of those people who are motivated enough to attempt it, all I can say is godspeed!
